Nice little setup that, good work

You are using an out of date browser. It may not display this or other websites correctly.
You should upgrade or use an alternative browser.
You should upgrade or use an alternative browser.
R2 the battle bus
- Thread starter S0updragon
- Start date
S0updragon
Well-Known Member
Nearly there for this half. Repaint original corner bits and a bit of tweaking but can’t do that until I have a longer bit of gas hose as it won’t quite reach into the corner  . Unfortunately as I put piano hinge on roof sides the headlining won’t go back as before so I thought it would be a quick fix.......... oh silly me


. Unfortunately as I put piano hinge on roof sides the headlining won’t go back as before so I thought it would be a quick fix.......... oh silly meWow!
S0updragon
Well-Known Member

S0updragon
Well-Known Member
Lol stitching’s a bit wobbly. The biggest whoopsie I made (as long as they fit and work) is the error I made in the shop with the meterage as I have nearly enough to make another set.
S0updragon
Well-Known Member
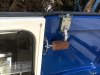
Well have started the last section. Decided to have a different bit by the door similar to the other side to be able to hang up a wet coat which was fortunate as I completely messed up the big L front. Measured and triple checked distance from seat to window edge allowed 15mm so I could offer up the side panel and scribe the line for the cut. Unfortunately I added the 15mm, 800mm ish to window and I cut 815 not 785mm. Luckily the helpful conversion company had some spare alu corner which fixed that problem. Unfortunately I had also forgotten about the 15mm overhang on the seat. Realised in time so could allow for that. Now the end panel sits exactly on the seam on the vertical seam on panel so end panel sits out of square to get side past it. So I may live with that depending on how I’m going to build the end bit Arghhh! So much for measure twice, cut once. More like measure thrice, cut twice and redesign it.


S0updragon
Well-Known Member
Admittedly there was a bit of a tourettes moment. The silver lining was they didn’t charge me for the alu corner.
S0updragon
Well-Known Member
Bit bored with making furniture so made a handle. And yes it’s a lever ball valve handle with the hole filed bigger. Go team!
S0updragon
Well-Known Member
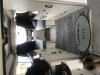
Built the furniture so just have to do the worktop. Not putting a sink in as I never used it and have removed the water tank anyway. I only have 3 spare days now to get it useable for Cornwall camping on Friday
Attachments


S0updragon
Well-Known Member
No problem. All i have to do is paint and fit the unit, paint and seals for roof sides, make a table, take down rear head linings and replace, hang curtains and make the set for cab area, make rear seat cushion covers, find bad earth for the front n/s indicator and o/s side light, tidy up, check fluids, take him for a spin to make sure everything works etc, pack and plan route. Easy lol
Sounds like the day before all my hols
S0updragon
Well-Known Member
Roof sides seals on. Furniture is sort of finished. Time to stop as making mistakes
S0updragon
Well-Known Member
Got a nice bit of oak which made the bed rails. Linseed oiled, as well as the patio as I knocked the bottle over, whoops
S0updragon
Well-Known Member
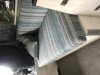
That’s as much as I can get done at the moment. Found a very helpful upholsterer just round the corner from me. Dropped off the foam and material on Tuesday afternoon and picked up finished product this morning. How marvellous