
You are using an out of date browser. It may not display this or other websites correctly.
You should upgrade or use an alternative browser.
You should upgrade or use an alternative browser.
Betty the Commer Pizza Truck Project.
- Thread starter Leerec
- Start date
These engines weren't fitted with proper stem seals just 'O' rings that were supposed to stop oil from going down the bores when the engine is idle optimistically called 'sealing rings' in the manual. Not very effective and but better than nothing and should be included in the head set. Just looked at the head set on aBay and they can be seen in pairs in the bore holes in the gasket.
yeah i did see those and think they just looked mega small and different to what i had seen online, thanks buddy, taking the head to the brother in law tomorrow and hes going to teach me how to sort it all out and do any machine work needed so shes looking like shes savedThese engines weren't fitted with proper stem seals just 'O' rings that were supposed to stop oil from going down the bores when the engine is idle optimistically called 'sealing rings' in the manual. Not very effective and but better than nothing and should be included in the head set. Just looked at the head set on aBay and they can be seen in pairs in the bore holes in the gasket.
Thought I’d update you, heads fine! Somehow it’s gone in, through the valve, out the other end without even hitting it! Then landed flat In the piston area. I’m a Lucky man!Good to have someone who can help
Also. The eBay gasket set you linked, they are based literally a 20 min drive from me, drove down today to collect it to save faff with postage and waiting, tomorrow I’ll put new rings on the valves and then Wednesday onwards I’ll be putting her back together !
Hopefully by Saturday she’ll be running again!
Need to hunt a new dizzy and potential coil but might do that later down the line as I now know how to get to all that fairly easily.
Been a wild few days
Gasket Peoples contact details below if you ever need them. They stock tons and were a lovely bunch, most is NOS stock too
Attachments

Slowly putting her back together! The side cover thing where the tappets are barely had a gasket on it before so I suppose it’s good to have all new gaskets everywhere !
Attachments


Starting to come back together now! A clean table so the Roast dinner is on for Sunday!
Gave her a push in 4th gear and the valves and rocker gear all moving correctly with no lock ups which is promising.
The gasket set, the thermostat cover bit didn’t fit so need to make one for that. The rest of the gasket kit was spot on for anyone wondering.
Next week I can get back to building the gas box for the rear then need to get the dizzy valve clearances and timing sorted then she should be good to go!
Attachments


Betty is fully back together and running!
Well, she’s running pretty bad, the vacuum hose basically snapped off on my hand so I’ve had to plug it at the carb and dizzy for now just to get her fired up. Got some new stuff coming Saturday hopefully.
In other news my thermostat seems to have a leak. It’s pretty corroded so I’m thinking just order a new one to save the hassle .
Attachments


So update, 4th cylinder I am getting a spark but its not firing. When i pull the lead off the engine doesnt change, does with all the other cylinders, unsure if its Valve clearance on that cylinder or a compression issue, deffo getting some compression just from the finger test but tomorrow I will re-do all the valves, then check compression and fit a new advanced vacuum hose as my one snapped whilst i was taking it all apart. I'm praying its something simple.
Tried the plug swap, still cylinder 4, tried the leads too, so I’m hoping ive done the valve clearance too tight on the 4th cylinder.Swap the plugs around and see if that make a difference. If not try swapping the leads to see if you can isolate the problem.
Will re-do them all again tomorrow. The do a compression check. Pray for me I don’t want to have to have the head off again
Well guys, its looking like I need a new piston. My question is, what size pistons fit well in my setup, I have an Su carb job done on the manifold and she was running lovely before nutgate happened. I dont mind having to get stuff rebored or honed, if you were in my shoes and had a 1974 1725 iron head, what would you do, im thinking 4 new pistons but unsure what size is best and at the moment I havent got the damaged piston out so size wise im unsure whats in it until i get some daylight this week and get to it. Any suggestions welcome, apart from fit a V8 ")
First thing is to clean the top of the pistons and check for markings. If you see, say, 0.020 that means it's been re-bored to twenty thousandths of an inch over standard. You may find it's still a standard bore so a 0.020 bore would be good depending on and bore damage. I would let the machine shop decide on that and let them source piston, rings etc and have the main bearing and big end crank journals checked and at the very least have new bearings fitted. A new oil pump is advisable too.
Well guys, some updates from me on the project.
Firstly thank you for all the advice so far, we have a cracked piston.
So I now have another commer that needed too much welding so it’s going to probably be broken fully unless I decide to spend an incredible amount of money to try save it.
The engine in this was re built properly I believe by Martin, I could be wrong. If I am wrong whoever rebuilt it did a good job because it drives lovely, just a shame the drivers side of the whole motor and the underneath is very rotten!
It’s running a Weber carb but I may switch out to my SU Setup.
Anyway, here’s some pictures of what I’ve been doing!
Whist I can’t get this engine into Betty because yard space has become an issue, I’ve been focussing my attention to cab interior and things I’ve been wanting to do.
So I’ve been using the red vans layout to create what I ideally want for Betty when she’s all finished up!
Custom dash, door card templates, front of cab templates that got over the lights, engine cover templates, then my biggest challenge was the one piece mat which I’ve made up!
I also have tons of spares available especially engine rubbers, previous owner must’ve had an obsession with them
Attachments
-
 IMG_8788.jpeg206.1 KB · Views: 8
 -
 383C82F5-5093-42D8-99F6-599BAE5CE18E.jpeg75.5 KB · Views: 9
 -
 237A7217-4719-42B5-A11F-389CAF6983FC.png497.3 KB · Views: 11
 -
 FF6EEF18-5506-4AFF-A8FF-311C9143F3F5.jpeg57.1 KB · Views: 9
 -
 IMG_8786.jpeg150.5 KB · Views: 8
 -
 IMG_8765.jpeg179 KB · Views: 8
 -
 IMG_8763.jpeg97.9 KB · Views: 8
 -
 IMG_8762.jpeg130.1 KB · Views: 9
 -
 IMG_8727.jpeg153.7 KB · Views: 9
 -
 IMG_8612.jpeg119.1 KB · Views: 16
Fitted a powerspark high energy dizzy and new viper VCE dry coil with new leads to this red vans engine last week, makes the world of difference highly recommend for anyone who hasnt already done it.
Engine will hopefully be being removed in the next couple of weeks once space is available up the yard, so currently pizza truck progress has massively slowed as I need this engine into Betty before I can really get stuck in but with the weather starting to get better hoping to be quite speedy getting stuff done once the vans got space in the yard to do the mighty engine swapout.
Engine will hopefully be being removed in the next couple of weeks once space is available up the yard, so currently pizza truck progress has massively slowed as I need this engine into Betty before I can really get stuck in but with the weather starting to get better hoping to be quite speedy getting stuff done once the vans got space in the yard to do the mighty engine swapout.
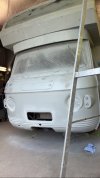
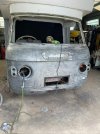
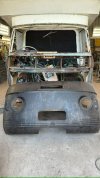
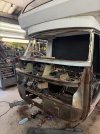
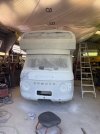
Hi guys! Hope you are all good! It’s been a while so thought I’d post an update, Betty now has an engine, Robin has gone off to a new home.
It’s been a busy month for me and I’m finally starting to see the end goal in sight.
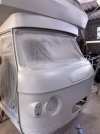
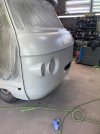
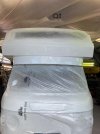
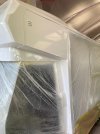
Roof is painted and looks good as new! next up the main cab.
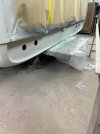
Then need to re fab the doors and get them painted up and it’s onto the finishing touches and trims.
So excited now with it all
It’s been a busy month for me and I’m finally starting to see the end goal in sight.
Roof is painted and looks good as new! next up the main cab.
Then need to re fab the doors and get them painted up and it’s onto the finishing touches and trims.
So excited now with it all
Attachments
-
 63E8E065-E4A0-4AFC-96F7-BDD4C5FD665F.jpeg65.4 KB · Views: 5
 -
 IMG_9525.jpeg120.6 KB · Views: 5
 -
 05529314-2152-41c5-a6c4-ad09c72fb4c2.jpeg86.1 KB · Views: 6
 -
 a1f91081-dc15-4794-a362-4fd1e3f56daa.jpeg85.8 KB · Views: 6
 -
 17CDE82F-BA85-442F-BACF-B4F34711993D.jpeg246.4 KB · Views: 6
 -
 C25FD2EF-3B33-4FD4-8F35-2EBFE8098549.jpeg288.6 KB · Views: 6
 -
 6BF13FF1-86E3-4C03-B50F-4AB593F5908C.jpeg111 KB · Views: 6
 -
 att.9jW2QVstpr6A1-yKLuy5WWhHAn5g03tisFQCa44zlcA.jpeg95.6 KB · Views: 6
 -
 IMG_9330.jpeg178.4 KB · Views: 5
 -
 IMG_9561.jpeg138.2 KB · Views: 6
Quick question regarding gear box oil and diff oil, do I need hypoid?Now that's progress, looking amazing