Jennings restoration

A bit more progress. There's hours and hours of work in the electrics once you get into it. So many bodges to sort out.

The loom is all sorted and wrapped in shiny new loom tape.

201521521273_2015_0215Commer0002.JPG


Then put back in. The old fusebox has been ditched, and now each circuit has been separately fused. There are three new fuseboxes, one each for lights, ignition, and non-ignition. The ignition and lighting switches each have a master fuse too (at the top), as that's where the major short occurred previously and nearly set fire to the van.

2015215213237_2015_0215Commer0005.JPG


Anyway, a word of warning here. I used these "Lucas 7RJ7FJ" fuseboxes because they look plausible, and take old fashioned glass fuses, of the kind originally used. Trouble is the fuseboxes don't even grip the old 1/4 inch fuses properly, and the newer 6mm size just rattle around in the contacts, so I had to take them back out, take out all the contacts individually and carefully reshape them to make decent contact with the fuses. That's a couple of hours work I didn't need. My apologies to the neighbours for the expletives I may have inadvertantly uttered. These fuseboxes are complete rubbish.

All tested out OK, and it's nice to have all the electrics livened up again, with no danger of short circuits or burning smells.

Then put the fuel tank back in, and made a start on repairing and reinstalling the rusty fuel lines.

Commer PB Jennings
 
So........

Peiced in some shiny new steel tube into the flow and return from the tank with compression fittings to replace the rusty sections over the back axle.

2015217204336_2015_0217Commer0002.JPG


Being diesel, there is no lining to the fuel tank, so it doesn't suffer from the dreaded "snakeskin", and the tanks don't have much water in the bottom due to the flow and return system depositing the water in the sediment bowl.

Here's bacterial gloop growing on the boundary between the water and diesel in the sediment bowl.

201521720488_2015_0217Commer0001.JPG


All cleaned out and reconnected.

Next, a look at the front end.

2015217204949_2015_0217Commer0007.JPG


Obviously a new front valance is required, along with a drivers step and inner cill.

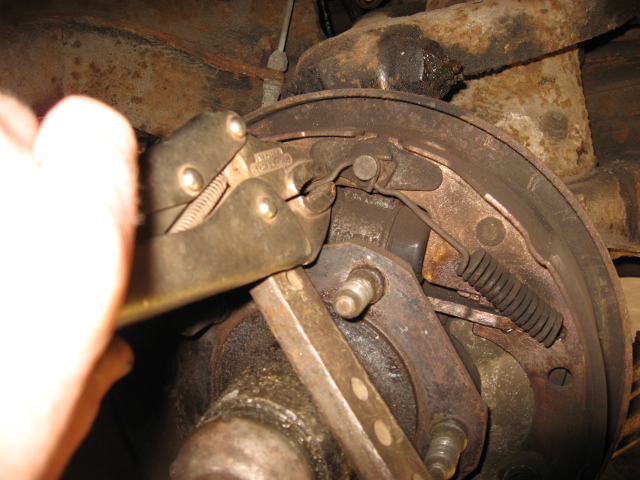
Then on to the front brakes and suspension.

Off with the drums.

I worked out a reliable method of removing and replacing those pesky brake springs.

2015217205313_2015_0217Commer0005.JPG


Grip the end of the spring with mole grips, then lever it around the hub with a metal bar. seems to work every time without risking skinned knuckles etc.

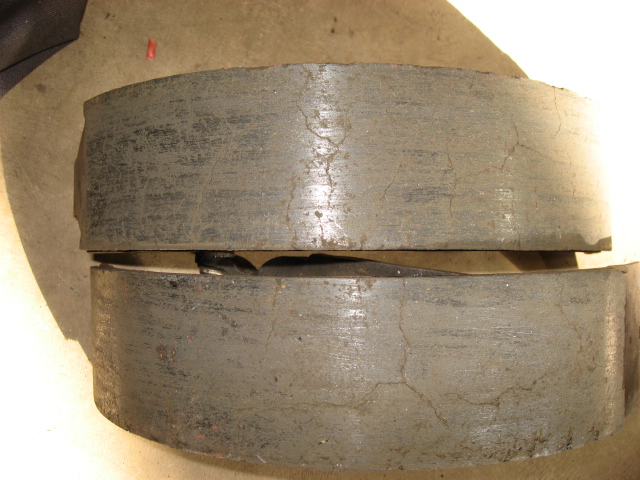
The shoes are breaking up.

2015217205545_2015_0217Commer0003.JPG


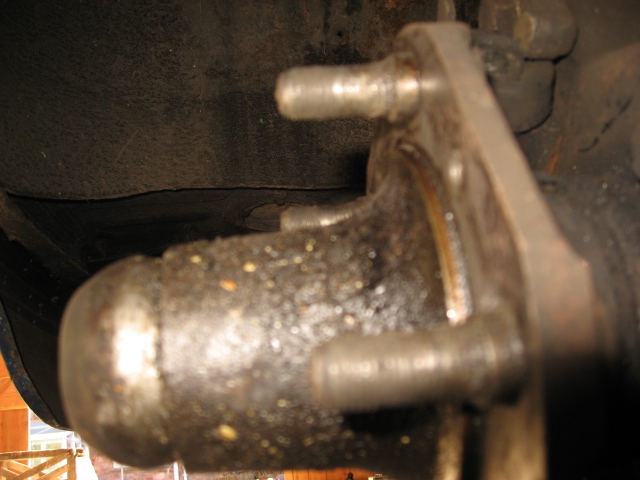
And the nearside wheel studs are worn.

2015217205657_2015_0217Commer0004.JPG


Both will need to be replaced.

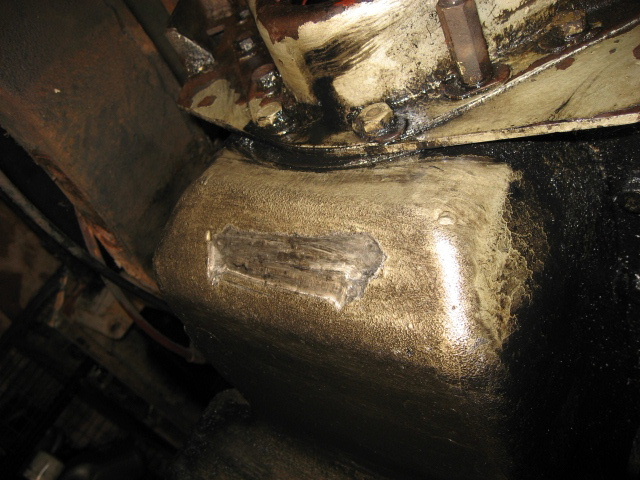
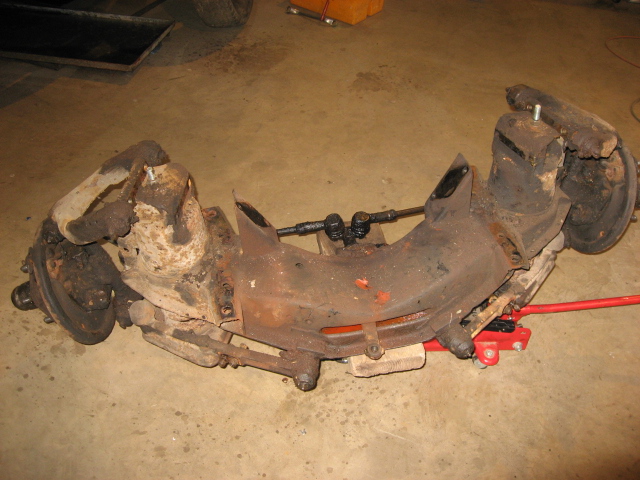
Time to drop the crossmember, as I could do with the extra room to weld the driver's inner cill, and it's caked in grease (not a bad thing by any means!).

2015217205949_2015_0217Commer0011.JPG


All the time I've been slaving away in the barn, I have hardly noticed that spring is well on it's way outside.

201521721330_2015_0217Commer0010.JPG


The snowdrops might look a bit different tomorrow after I've pressure washed all the grease off the crossmember!


Commer PB Jennings
 
Now that is a very handy tip - cover your snowdrops prior to jet washing;) The mole grips and lever looks better than the 'close your eyes and prise with a screw driver' method I usually employ:I
The damage brake shoes looks very typical of part worn bonded ones, I put it down to over heating but it seems to happen an awful lot[V]

41fa30c8-22ce-43e8-bd12-188475a80292.jpg
 
Cleaned up the front crossmember and all its bits.
First I tried pressure washing, That got rid of the mud but didn't shift the old grease at all.
So I ended up with a scraper, a hot air gun and a compressor. Scrape, heat, blow. Hot grease gives you a spotty face.

All dismantled, crossmember painted, suspension and steering checked over, rebuilt cylinders, new brake pipes/hoses, hubs serviced, new oil seals.


While i've got the crossmember off, how about the front crank seal. Yes, it's leaking. Looks like a job for two fat blokes and a scaffold pole.

201522221910_2015_0222Commer0002.JPG


But, unlike me, not as tight as it looks. But what's this?

2015222211212_2015_0222Commer0004.JPG


That's the steering which has been grinding away the front of the sump! That must have been quite scary when braking hard for a roundabout. What with that, and jumping out of third at the same time. All due to the previous crappy gearbox mount, and of course knackered engine mounts too!

Suddenly had a thought.........The heater matrix must
be made to fit only one way up, so it can bleed air out. (Else the air at the top of the diamond shape would just stay there.) So I poked a hooked piece of wire up the tubes, and discovered that yes indeed, they are different lengths inside the matrix, and yes, I had fixed it upside down. So I took it all apart again, and put the matrix back in the right way up.

2015222211839_2015_0222Commer0007.JPG


I measured carefully, and I've marked where the tubes finish inside the matrix. You can see that it must go this way up, to bleed out air. And connected the right way round too. Water in at the bottom, and out at the top. Learn a bit every day!

The exhaust will be next...........


Commer PB Jennings
 
Great stuff, keep it coming. I would NEVER have thought of that with the heater...
But then i just took it out altogether. :)

I just need a good rootes...
 
Iceman: It was only after reading another thread on here (can't remember where), about someone who had flushed out their heater and couldn't get it to work afterwards. I have one of these heaters in the truck, and it's very effective, so I did wonder how that could possibly happen. When I find out stuff there's no point keeping it to myself!

On another subject, it's quite worrying that this van was getting MOTs every year, but when I bought it, it had serious defects on the brakes (cylinders seized, shoes breaking up, rear hose closed up), steering (engine interfering), wheel security (worn wheel studs, loose halfshaft nut), electrics (main beam not working, short circuits), fuel leaks, chassis rot, transmission (jumping out of gear, pinion insecure), and bits of the coachbuilt body ready to fall off. Just goes to show that an MOT is no guarantee of good condition or safety. But I'm a cynical old dog, and have to have a look at everything myself before I'll trust it.

Commer PB Jennings
 
Oh....and going back to that heater matrix, the flow tube has three ridges, and the return tube has two. I wonder if they're all like that?

Commer PB Jennings
 
Great bit of detective work[^] I wonder if some got through the factory installed the wrong way up, it would explain why some heaters are a lot worse than others - check your ridges folks.

41fa30c8-22ce-43e8-bd12-188475a80292.jpg
 
The heaters were assembled by Smiths, and once assembled can only be installed the right way up. Millions of them for all sorts of different cars. I reckon they must have had a system to get them right. My bet would be on replacement matrices (Matrixes?)being upside down.

Commer PB Jennings
 
quote:
Originally posted by colinthefox

Suddenly had a thought.........The heater matrix must be made to fit only one way up, so it can bleed air out. (Else the air at the top of the diamond shape would just stay there.) So I poked a hooked piece of wire up the tubes, and discovered that yes indeed, they are different lengths inside the matrix, and yes, I had fixed it upside down. So I took it all apart again, and put the matrix back in the right way up.


But you said..........................

quote:
Originally posted by colinthefox


The heaters were assembled by Smiths, and once assembled can only be installed the right way up.


BazRockscropped.jpg

I am not a person, I am a number, 395 actually......Be seeing you!
If I told you I was a pathological liar, would you believe me?
 
Yes indeed..........I took the heater unit out of the van, then after repairing the matrix, I reassembled it on the bench with the matrix the wrong way up inside it. Then I installed the heater back in the van the only way it will fit, resulting in the matrix being upside down still. On realising my mistake, I took the heater out again, took it all apart, and fitted the matrix the right way up inside the unit. Then I fitted the heater back in the van the only way it will fit, resulting in (I hope), a correct installation this time.

Please keep up!

Commer PB Jennings
 
But onwards to the exhaust......

Took a trip down to the exhaust wholesaler and found a box looking pretty much like the old one. With a generic 90 deg bend and a length of pipe I made up a new system. (The old dowwnpipe is still good)

2015224212226_2015_0224Commer0001.JPG


It's all cheapo mild steel, but as I don't know how effective it will be, I'll give it a try before I invest in a complete custom stainless system. Here it is fitted anyway. OK for 50 quid.

2015224212537_2015_0224Commer0004.JPG


Commer PB Jennings
 
A few more jobs tackled.

201531212033_2015_0228Commer0001.JPG


Strangely, although the van had a temperature gauge, there was no provision on the engine for a sender, and the wire was coiled up ready, so it had never worked. The choices were, drill and tap the cylinder head in situ. erm....no thanks! Or fit a sender in the top hose using an adaptor. But in the end I bought the smallest type of sender, and drilled and tapped the thermostat housing. Tested in boiling water, and it registers spot on.

Next, to make sure of getting the best out of the engine. A good start would be to find out why the pedal was only opening the throttle to about 3/4. The PO warned me it was slow!

No matter how I adjusted the pedal it was just the same. In the end I realised that the mech would work much better with the bell crank (or is it a trunnion?) on the side of the radiator the other way round. Then it worked perfectly. Does this mean it had been back to front all along?

Diesel engines need the maximum amount of air to work hard. The air intake looked pretty asthmatic to me. The duct from the air filter was smaller than it could have been.......

20153121363_2015_0228Commer0014.JPG


and the intake to the air filter was very small

201531214218_2015_0228Commer0006.JPG


and positioned right behind the radiator bracket

201531213813_2015_0228Commer0002.JPG


now that's not good.

Cut off the little intake, and welded on a much bigger one

201531214342_2015_0228Commer0007.JPG


angled to fit an air duct taking air from in front of the radiator where the pressure must be higher, and the air much cooler. That has got to be better!

201531214133_2015_0228Commer0015.JPG


Refitted the air cleaner with a larger duct into the engine.

201531214544_2015_0228Commer0016.JPG


The result should be the maximum quantity of air, with the minimum of intake noise. That's about all I can do with the breathing.

It will be a while before Martin makes the panels for the front I think, so I'll turn my attention to refitting the living quarters with some nice new Oak veneered ply.

Commer PB Jennings
 
I find it very pleasing when all these little jobs get crossed off the list[^]

41fa30c8-22ce-43e8-bd12-188475a80292.jpg
 
You and me both Panky. And what a list!

I've just done a new pipe from the brake fluid reservoir to the master cylinder. The one that was fitted was the wrong size, and rubbed on the gear change due to bad routing! That was most of a day gone by the time I'd sussed out the correct route and made up the pipe.

Don't you just love the "just" jobs too. "Just" fit a new rear brake hose...........only to find that the long brake pipe front to back was fitted with a METRIC nut screwed onto the old IMPERIAL hose. To fit the right nut I had to cut and reflare the tube in situ.........with my vice mounted flaring tool. Grrrrrrrrrrr.

Should we start a thread entitled "Bodge of the day" to highlight this sort of thing?

Commer PB Jennings
 
Panky, I've just read some of your mammoth thread while searching for step/cill repair pictures. The bit where you added a temperature sender, intake air duct and do the throttle linkage seems strangely familiar! Honest I hadn't read it before posting about my activities. I should have some panels coming soon, so will soon be back on the welding.

Meanwhile, I've been in the back replacing some ply panels.............

Using the old panels as patterns, but they aren't a very good fit, so there's a lot of adjustments to make. Still a lot easier than making new patterns. The original panels were replaced on 15th February 1997 by FR. I wonder who that was. The replacements were ordinary Birch faced ply varnished, but not matching the originals. The new panels are Oak veneered ply, and will be stained to match the remaining originals, which have been sanded and heavily waxed.

201534204359_2015_0304Commer0001.JPG


Once the old panels are off, remove ALL of those nasty little nails which will stop the new panels lying flat.

201534204657_2015_0304Commer0003.JPG


The adhesive is "Everbuild Maximum Torque". It's really tacky so if the woodwork is half reasonable, you don't have to nail the panel at all, just press it really firmly into place.

201534205418_2015_0304Commer0004.JPG


Here's the toilet repanelled, and fitted with a new bog box. It's snug, but usable, and yes, I have tried it out!

201534205320_2015_0304Commer0005.JPG


I'm trying to clear the barn floor, so the cooker was cleaned up and re-installed.

201534205616_2015_0304Commer0007.JPG


I've started on the fridge installation, but it was bodged in (now there's a surprise!) so some alterations will be required. It only had ventilation to the internal space, so I will have to put fridge vents in the side panel under the window. Seems a pity, but if we want to have a fridge, it's just got to be. I'll look for some classic style vents, but don't know what they would look like. Does anyone have photos of an original fridge vent in the side of a Jennings? What do other people do?

Commer PB Jennings
 
Great minds think alike:D
Bonnie didn't have a fridge when we got her but there had been one originally and as you say the venting consisted of a mesh grille at the back of the worktop - but there are a couple of louvered panels to cause a draft and allow the carbon monoxide to circulate nicely inside the van[xx(] Modern vent kits are dead simple but do have plastic vent covers on the outside, I think this would be more in keeping

http://www.ebay.co.uk/itm/Electrolux-Caravan-Motorhome-Exterior-Fridge-Vent-Cover-/361130382645?pt=LH_DefaultDomain_3&hash=item54150c5535

When I re-fitted a fridge to Bonnie I modified an old gas one to run on 240v, don't like gas:I

41fa30c8-22ce-43e8-bd12-188475a80292.jpg
 
Back
Top