You are using an out of date browser. It may not display this or other websites correctly.
You should upgrade or use an alternative browser.
You should upgrade or use an alternative browser.
'76 Autosleeper
- Thread starter BigMonkeyMan
- Start date


engine runs fine (now I jump started it like I should have done in the FIRST PLACE !)
the box is wonky... I disconnected the little linkage bar, wiggled it a bit and that is ok, the big linkage bit is jammed I think. I jacked up hte back end and wiggled the wheel which disengaged the box so she could be pushed/towed/thrown in a skip
Rupert
www.littleyellowcar.co.uk
the box is wonky... I disconnected the little linkage bar, wiggled it a bit and that is ok, the big linkage bit is jammed I think. I jacked up hte back end and wiggled the wheel which disengaged the box so she could be pushed/towed/thrown in a skip
Rupert
www.littleyellowcar.co.uk
yeah thats right panky, but I only have the overdrive bit (I still need a box) Martin has come to the rescue though
www.littleyellowcar.co.uk
www.littleyellowcar.co.uk

phew, you had me a bit worried there - hope repairs prove straightforward[8)]
Bessie - four star commerdation
Bessie - four star commerdation
hello everyone - I thought I'd restart this thread as Jessica has proved worthy of my attention again after her sterling work this weekend. The gearbox was superb so now its time to get her a new MOT.
the main thing I'm worried about is the door step (not structural I know, but I got an advisory last year - so it would be rude to ignore it!)
So tonight it was slyyyyder time (the J4 got Jess inspired...)

This is the bit that needs fixing.

One of Martin's new panels could do it, but I think there is more steel than hole (if you know what I mean) so I'll have a crack at sorting it with steel.
The doors are franky embarassing so they need a good going over too...
(Commerjules put me to shame at the weekend) so they are getting the woolfie panels I baught ages ago...

I need to track down Martins pics from the telecom engineer's van for reference.
Theres a growing todo list as well.
The manifold / head gasket has gone (Well diagnosed Panky) - means I can fit the new Manifold and SU
The oil leak has got very silly and messy - so that will need the steering taking to bits to sort it properly (sump off)
There is a little welding needed at the rear chassis/rear door pillar joint - which means the tank must come out (I need a new rubber filler hose too)
and thats it (For now)
all just in time for the season good weather to begin!
Rupert
www.littleyellowcar.co.uk
the main thing I'm worried about is the door step (not structural I know, but I got an advisory last year - so it would be rude to ignore it!)
So tonight it was slyyyyder time (the J4 got Jess inspired...)
This is the bit that needs fixing.
One of Martin's new panels could do it, but I think there is more steel than hole (if you know what I mean) so I'll have a crack at sorting it with steel.
The doors are franky embarassing so they need a good going over too...
(Commerjules put me to shame at the weekend) so they are getting the woolfie panels I baught ages ago...
I need to track down Martins pics from the telecom engineer's van for reference.
Theres a growing todo list as well.
The manifold / head gasket has gone (Well diagnosed Panky) - means I can fit the new Manifold and SU
The oil leak has got very silly and messy - so that will need the steering taking to bits to sort it properly (sump off)
There is a little welding needed at the rear chassis/rear door pillar joint - which means the tank must come out (I need a new rubber filler hose too)
and thats it (For now)
all just in time for the season good weather to begin!
Rupert
www.littleyellowcar.co.uk

wasn't it the detector pic's Rupert ?
Sybhil & no1
Sybhil & no1
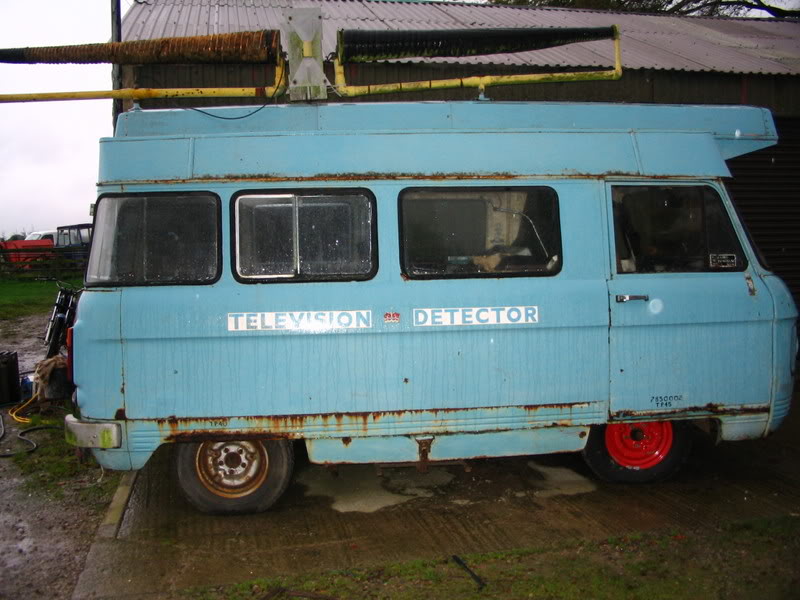
Telecom van
following BMM & panky to Steves
http://www.youtube.com/watch?v=45rbKGpFFnU
Sybhil & no1
http://www.youtube.com/watch?v=45rbKGpFFnU
Sybhil & no1
you had difficulty keeping up there I notice
www.littleyellowcar.co.uk
www.littleyellowcar.co.uk
ok then - little update commerfans
Jessica is getting a door refresh at the moment and I've been doing plenty of reading up on the subject...(well looking at this thread http://66.129.69.181/forum/topic.asp?TOPIC_ID=1156&whichpage=2) and I have a couple of questions.
What are those little semicircular cutouts on the bottom of the doorskin for??
what should the steel around the check strap mount look like? Jessica has air where the steel should be....
thanks gang!
Rupert
www.littleyellowcar.co.uk
Jessica is getting a door refresh at the moment and I've been doing plenty of reading up on the subject...(well looking at this thread http://66.129.69.181/forum/topic.asp?TOPIC_ID=1156&whichpage=2) and I have a couple of questions.
What are those little semicircular cutouts on the bottom of the doorskin for??
what should the steel around the check strap mount look like? Jessica has air where the steel should be....
thanks gang!
Rupert
www.littleyellowcar.co.uk
The 2 cutouts are so you can get a socket onto the chekstrap bracket, mounting bolts There should be an 1/8th plate, with two screw holes in, that sits inside the bottom of the door, to fasten the check bracket to. This usually comes off with the old bracket [xx(]
There should be an 1/8th plate, with two screw holes in, that sits inside the bottom of the door, to fasten the check bracket to. This usually comes off with the old bracket [xx(]ahah! makes sense now. The inner skin should go between the bracket and its mount (leaving the 3 holes in your pictures Martin). This job is making me really glad I got that sheet metal bender.
I can see (well imagine) where they go now. thanks Martin. I think I'll leave the semicircular cutouts off for the time being (not a concours chap myself)
I made a bit more progress last night:


hopefully I'll get a chance to do some more at the weekend
Rupert
www.littleyellowcar.co.uk
I can see (well imagine) where they go now. thanks Martin. I think I'll leave the semicircular cutouts off for the time being (not a concours chap myself)
I made a bit more progress last night:
hopefully I'll get a chance to do some more at the weekend
Rupert
www.littleyellowcar.co.uk
its a woolfie panel I baught last winter (before I decided to start gear-boxing) My tin bashing is quite er agricultural. The basic shape is there, but I haven't got the tools to finesse it. Saying that the door repairs are (so far) pretty straight forward, lots of nice flat panels.
We'll see how it progreses..
www.littleyellowcar.co.uk
We'll see how it progreses..
www.littleyellowcar.co.uk
hello everyone, it's been a long long time since I last posted in Jessica's thread so I thought I'd give you a little update.
Well she's been used and abused, but about a year or so ago she started having some reliability problems which I eventually traced to snakeskin after much mucking about and pushing of vans up hills by neighbors.
so a little while ago I had the tank out, all the fuel tubing out and the carb off.
the tank got a good clean out and was sealed with a kit from Frost (I'll be ordering a tim-tank as soon as I can afford one!), the fuel line was replaced with Rubber hose and a facet type square electric fuel pump was installed (thanks for the help Baz!). Finally to top it all off I finally got round to fitting the wonderful SU carb conversion (thanks Tim! - I have that manifold I owe you Panky!) it is really really good. I'm so impressed and annoyed that I hadn't fitted it before! I'll write up the fitting in due course - but it was easy peasy!


I still need to tune the carb up properly, and I've been having a little problem with the fuel pump not priming properly (probably not mounted low enough) but there may be some light at the end of the tunnel!

looking forward to a summer of commering if I manage to get through the new scary MOT.
Rupert
"Not tonight love - I'm varnishing me roofrack"
www.littleyellowcar.co.uk
Well she's been used and abused, but about a year or so ago she started having some reliability problems which I eventually traced to snakeskin
after much mucking about and pushing of vans up hills by neighbors.so a little while ago I had the tank out, all the fuel tubing out and the carb off.
the tank got a good clean out and was sealed with a kit from Frost (I'll be ordering a tim-tank as soon as I can afford one!), the fuel line was replaced with Rubber hose and a facet type square electric fuel pump was installed (thanks for the help Baz!). Finally to top it all off I finally got round to fitting the wonderful SU carb conversion (thanks Tim! - I have that manifold I owe you Panky!) it is really really good. I'm so impressed and annoyed that I hadn't fitted it before! I'll write up the fitting in due course - but it was easy peasy!
I still need to tune the carb up properly, and I've been having a little problem with the fuel pump not priming properly (probably not mounted low enough) but there may be some light at the end of the tunnel!
looking forward to a summer of commering if I manage to get through the new scary MOT.
Rupert
"Not tonight love - I'm varnishing me roofrack"
www.littleyellowcar.co.uk