
You are using an out of date browser. It may not display this or other websites correctly.
You should upgrade or use an alternative browser.
You should upgrade or use an alternative browser.
The New Project
- Thread starter Suinnyboy
- Start date


I haven't come across anything indicating whether they arrived in Australia fully built or in CKD form and assembled here. I understand that the trip from the UK in either form would have been at least 8 to 10 weeks, maybe longer in those days, just to land here then delivery and possibly assembly time needs to be added.
Thats why I'm curious about the date on the cross member. Was it stamped at the UK factory on all vans, or was it something done locally here in Australia.
I'm also thinking of writing to the local newspaper in Inverell, where the van originally came from, to see if they will print a picture and story so I can find out more about its history. I mentioned in my first posting that you can see EXPRESS DELIVERY under the paint on the rear doors, so I suspect it may have been the local delivery van for a larger freight company and hopefully often seen around town doing it "Express Delivery" thing. Hopefully there are some older locals that remember it.
Cheers Stephen
Thats why I'm curious about the date on the cross member. Was it stamped at the UK factory on all vans, or was it something done locally here in Australia.
I'm also thinking of writing to the local newspaper in Inverell, where the van originally came from, to see if they will print a picture and story so I can find out more about its history. I mentioned in my first posting that you can see EXPRESS DELIVERY under the paint on the rear doors, so I suspect it may have been the local delivery van for a larger freight company and hopefully often seen around town doing it "Express Delivery" thing. Hopefully there are some older locals that remember it.
Cheers Stephen
The work on the van is coming along good Stephen, well done !! Do you know maybe when it was last registered, and also have you thought of doing a rego check of sorts even using a engine no or chassis no to get some more history on the van. Even if you haven't got a rego no, they may able to find more info by a engine or chassis no at the following NSW government RTA address
http://www.rta.nsw.gov.au/myrta/rego/free-registration-check.html
You may need to contact them if you don't have a rego no to try and get some info. If you can get some previous info, maybe including previous owners etc, will add to the history of the van. All the best with getting the info.
Do you know maybe when it was last registered, and also have you thought of doing a rego check of sorts even using a engine no or chassis no to get some more history on the van. Even if you haven't got a rego no, they may able to find more info by a engine or chassis no at the following NSW government RTA addresshttp://www.rta.nsw.gov.au/myrta/rego/free-registration-check.html
You may need to contact them if you don't have a rego no to try and get some info. If you can get some previous info, maybe including previous owners etc, will add to the history of the van. All the best with getting the info.
Thanks for the kind words,
I had thought of going/speaking to the RTA, or whatever they call themselves now, but had been hesitant due to the fact that the only information I have is the chassis/body number. Unfortunately the Van has been off the road for many years, with the rego papers lost and no number plates or old rego stickers on the window, plus no motor when I bought it.
I've always found that with the RTA you have to get the "right" person, otherwise you get the typical "computer says no" response.
I have emailed the Inverell Times Newspaper tonight together with the following picture, which was taken by the owner in Inverell when he sold it to the guy I bought it off, which might help jog someones memory.

Just have to sit back now and see what happens with my fingers crossed.
Cheers Stephen
I had thought of going/speaking to the RTA, or whatever they call themselves now, but had been hesitant due to the fact that the only information I have is the chassis/body number. Unfortunately the Van has been off the road for many years, with the rego papers lost and no number plates or old rego stickers on the window, plus no motor when I bought it.
I've always found that with the RTA you have to get the "right" person, otherwise you get the typical "computer says no" response.
I have emailed the Inverell Times Newspaper tonight together with the following picture, which was taken by the owner in Inverell when he sold it to the guy I bought it off, which might help jog someones memory.
Just have to sit back now and see what happens with my fingers crossed.
Cheers Stephen
Hi all
In the process of stripping and rebuilding the front suspension I have discovered that the drivers side upper fulcrum pin is badly worn as can be seen in the picture.

I haven't checked the other side yet, or the lower fulcrum pins, but expect the same sort of wear after close to 50 years. I see from Martin's website, he has the lower one available as a kit and was wondering if anyone has a list of what makes up the Upper/Lower kits.
Anyone have any shortcuts or tips on replacing them? I have a copy of the manual, but any "hands-on" information would be appreciated as they look like they could be bit "interesting" to get apart.
Cheers Stephen
In the process of stripping and rebuilding the front suspension I have discovered that the drivers side upper fulcrum pin is badly worn as can be seen in the picture.
I haven't checked the other side yet, or the lower fulcrum pins, but expect the same sort of wear after close to 50 years. I see from Martin's website, he has the lower one available as a kit and was wondering if anyone has a list of what makes up the Upper/Lower kits.
Anyone have any shortcuts or tips on replacing them? I have a copy of the manual, but any "hands-on" information would be appreciated as they look like they could be bit "interesting" to get apart.
Cheers Stephen
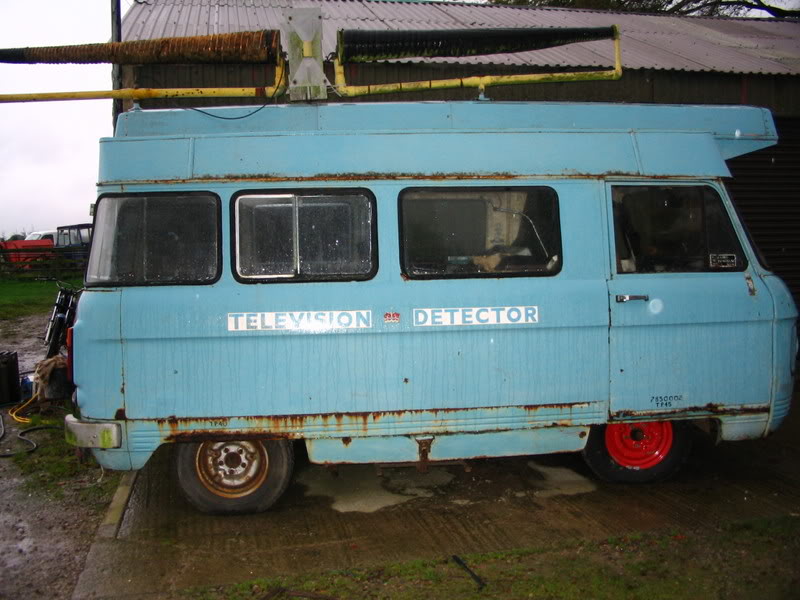
If its the outer ones, top and bottom of the stub axle carrier, they are both the same.
http://www.commervanspares.co.uk/
http://www.yorkshireclassiccampers.co.uk/
http://www.commervanspares.co.uk/
http://www.yorkshireclassiccampers.co.uk/

Hi all
With the question of the age of my van still in my head I decided to have a look in the workshop manual, as I had noticed a section in the forward that breaks down the body/chassis number.

Unfortunately it made things worse, the manual stated that the VT prefix makes it a Van with hinged doors and extra sliding door. Well after checking my glasses, I'm still looking, and cannot see a sliding door anywhere! On checking the manual again I notice that the copy I have is for vehicals made after 1967. Has anyone got an earlier copy of the manual or can shine some light on this for me.
Thanks
Stephen
With the question of the age of my van still in my head I decided to have a look in the workshop manual, as I had noticed a section in the forward that breaks down the body/chassis number.
Unfortunately it made things worse, the manual stated that the VT prefix makes it a Van with hinged doors and extra sliding door. Well after checking my glasses, I'm still looking, and cannot see a sliding door anywhere! On checking the manual again I notice that the copy I have is for vehicals made after 1967. Has anyone got an earlier copy of the manual or can shine some light on this for me.
Thanks
Stephen
Hi all
Got excited the other day when my, new chrome plated wheel nuts arrived from the USA. Brillent quality, extra long to suit the recessed and tappered seat inserts in the mags. Got 25 1/2" UNF for $55 US. Remember I have gone to 6 stud on my van, so 24 to use and 1 spare, which I will try not to loose! I went out and bolted the front hub/disc to check them, perfect.


It was only when I thought of fitting them to the mags currently on the rear of the van that I remembered that those wheel studs are M12, the original Nissan Navara size. It's been some time since I did the diff swap and had totally forgotten. So now I've ordered a set of 12 1/2" UNF studs from the trailer parts company that I bought the front hubs from for the front disc brake conversion, so I can get the rear end sorted in the near future.
Cheers
Stephen
Got excited the other day when my, new chrome plated wheel nuts arrived from the USA. Brillent quality, extra long to suit the recessed and tappered seat inserts in the mags. Got 25 1/2" UNF for $55 US. Remember I have gone to 6 stud on my van, so 24 to use and 1 spare, which I will try not to loose! I went out and bolted the front hub/disc to check them, perfect.
It was only when I thought of fitting them to the mags currently on the rear of the van that I remembered that those wheel studs are M12, the original Nissan Navara size. It's been some time since I did the diff swap and had totally forgotten. So now I've ordered a set of 12 1/2" UNF studs from the trailer parts company that I bought the front hubs from for the front disc brake conversion, so I can get the rear end sorted in the near future.
Cheers
Stephen
Hi All
Things have been a little quite on the project recently. I recently started a new job and have been busy there learning the ropes. I have also been spending some time sorting and re-organising the house and shed over the last 3 weekends, which will free up some space and make life more pleasent. The good news is that I managed last weekend to empty the van of all the things that had been stored in it for the last 12 or so months. I never managed to get around to taking any pictures of the inside previously, but jumped at the chance when I got it!
 The Cabin from the side door.
 The load area from the cabin.
 The floor of the load area was covered with a particle board sheeting, which seems to have protected it well. The others sheets were damaged or partly rotted and removed when I first got her home. With them removed I was able to see the condition of the floor underneath. Pretty good nick with mostly surface rust near the rear doors, where the particle board was worst.


The Passenger side rear wheel arch and the Drivers side wheel arch. Yes look carefully and you can see how easy we have it here in Australia when it comes to rust.

 The inside rear corners.
 And finally the load area from the rear doors
Unfortunately some things have had to go back into the van for storage, but I am happier having seen it again and not planning to do any interior work for the moment. From what I have read on the forums and the work you over there do over there on your vans, you'd probably have my interior would be done on a weekend. So if you happen to have a spare weekend and by chance find yourself in Sydney with nothing to do, you're most welcome to show me your skills.
On another matter, I managed to pick up another gearbox, this one from a Nissan Nomad on Ebay for $90. It's basically the same as the Urvan gearbox that I have and bolts straight on to the Nissan Z24 motor.

The big difference is the gearbox mounting is positioned on top of the gearbox. Hopefully the mounting from the van will be neater, not needing the usual low slung bracket under the gearbox. The gear selector rods feel tighter on this one and it also has the selector cable mounting bracket, hidden from shot on the other side of the gearbox, which my other one was missing.
That's it for now, once I've cleared of my bench in the shed I'll get back to the front suspension. I have dropped off the front stub axles to be shortened, but with the new job haven't managed to call and see if their finished or not. Better put that on the list of things to do this week.
Cheers until next time
Stephen
Things have been a little quite on the project recently. I recently started a new job and have been busy there learning the ropes. I have also been spending some time sorting and re-organising the house and shed over the last 3 weekends, which will free up some space and make life more pleasent. The good news is that I managed last weekend to empty the van of all the things that had been stored in it for the last 12 or so months. I never managed to get around to taking any pictures of the inside previously, but jumped at the chance when I got it!
The Passenger side rear wheel arch and the Drivers side wheel arch. Yes look carefully and you can see how easy we have it here in Australia when it comes to rust.
Unfortunately some things have had to go back into the van for storage, but I am happier having seen it again and not planning to do any interior work for the moment. From what I have read on the forums and the work you over there do over there on your vans, you'd probably have my interior would be done on a weekend. So if you happen to have a spare weekend and by chance find yourself in Sydney with nothing to do, you're most welcome to show me your skills.
On another matter, I managed to pick up another gearbox, this one from a Nissan Nomad on Ebay for $90. It's basically the same as the Urvan gearbox that I have and bolts straight on to the Nissan Z24 motor.
The big difference is the gearbox mounting is positioned on top of the gearbox. Hopefully the mounting from the van will be neater, not needing the usual low slung bracket under the gearbox. The gear selector rods feel tighter on this one and it also has the selector cable mounting bracket, hidden from shot on the other side of the gearbox, which my other one was missing.
That's it for now, once I've cleared of my bench in the shed I'll get back to the front suspension. I have dropped off the front stub axles to be shortened, but with the new job haven't managed to call and see if their finished or not. Better put that on the list of things to do this week.
Cheers until next time
Stephen

quote:
Originally posted by Suinnyboy
Hi all
With the question of the age of my van still in my head I decided to have a look in the workshop manual, as I had noticed a section in the forward that breaks down the body/chassis number.
Unfortunately it made things worse, the manual stated that the VT prefix makes it a Van with hinged doors and extra sliding door. Well after checking my glasses, I'm still looking, and cannot see a sliding door anywhere! On checking the manual again I notice that the copy I have is for vehicals made after 1967. Has anyone got an earlier copy of the manual or can shine some light on this for me.
Thanks
Stephen
I was checking something on the parts list and notice there was a list of models and designations of the very earliest models on the first page. The VT designation is shown as 'hinged doors plus 3rd door' rather than the 'extra sliding door' mentioned in the other lists. All I can thing of is that it is a miss-print on the later editions of the manual:I
Hope this helps
You can find the parts list download by following the 'Mechanical' link from the CVF homepage.

Originally posted by Suinnyboy
Hi all
With the question of the age of my van still in my head I decided to have a look in the workshop manual, as I had noticed a section in the forward that breaks down the body/chassis number.
Unfortunately it made things worse, the manual stated that the VT prefix makes it a Van with hinged doors and extra sliding door. Well after checking my glasses, I'm still looking, and cannot see a sliding door anywhere! On checking the manual again I notice that the copy I have is for vehicals made after 1967. Has anyone got an earlier copy of the manual or can shine some light on this for me.
Thanks
Stephen
I was checking something on the parts list and notice there was a list of models and designations of the very earliest models on the first page. The VT designation is shown as 'hinged doors plus 3rd door' rather than the 'extra sliding door' mentioned in the other lists. All I can thing of is that it is a miss-print on the later editions of the manual:I
Hope this helps
You can find the parts list download by following the 'Mechanical' link from the CVF homepage.
Thanks for that, I have checked the parts book and that description makes better sense.
On looking further on page “vii” of the Parts Book, below the examples of the various ID plates, it mentions in the text that CKD kits between the given serial numbers, in which mine falls, were given Series 2 ID’s, but built to Series 2a specifications. Talk about confusing!!!
“The Commerfiles” mentions the change of grill to the “lozenge type” in August 1965 and by August 1967 to front hand brake and alternator. Key points for my van are the rear hand brake, wired for generator not alternator, single clear park/indicators at front, one piece enamel/pressed metal "Commer" badge on front and the small grill with 3 horizontal chrome trims. As it had no motor or gearbox, I am guessing that it had the small 1500cc engine.
This now raises the question, what is the VT360 stamping. Do you have the 2 numbers like shown in my earlier picture on a UK Commer, or is it something that was added during local assembly in Australia as the letters and numbers are different sizes than those in the Serial Number.
I still think the van is earlier that the 1965 originally suggested to me, but by how much I am unsure. I know there will be a lag factor for the CKD leaving the factory then travelling by ship to Australia for eventual assembly. Does anyone think or know if the British Motor Heritage would have records on CKD Exports as it seems to have a serial number that is in line with the UK factory output.
Cheers Stephen
On looking further on page “vii” of the Parts Book, below the examples of the various ID plates, it mentions in the text that CKD kits between the given serial numbers, in which mine falls, were given Series 2 ID’s, but built to Series 2a specifications. Talk about confusing!!!
“The Commerfiles” mentions the change of grill to the “lozenge type” in August 1965 and by August 1967 to front hand brake and alternator. Key points for my van are the rear hand brake, wired for generator not alternator, single clear park/indicators at front, one piece enamel/pressed metal "Commer" badge on front and the small grill with 3 horizontal chrome trims. As it had no motor or gearbox, I am guessing that it had the small 1500cc engine.
This now raises the question, what is the VT360 stamping. Do you have the 2 numbers like shown in my earlier picture on a UK Commer, or is it something that was added during local assembly in Australia as the letters and numbers are different sizes than those in the Serial Number.
I still think the van is earlier that the 1965 originally suggested to me, but by how much I am unsure. I know there will be a lag factor for the CKD leaving the factory then travelling by ship to Australia for eventual assembly. Does anyone think or know if the British Motor Heritage would have records on CKD Exports as it seems to have a serial number that is in line with the UK factory output.
Cheers Stephen
I think the position of the stamping must be unique to CKD kits as I've not seen it there on British vans, normally the chassis number is on a plate under the drivers seat and on the bulkhead just behind the engine cover. Mike Worthington Williams may have info on CKD's but it's a long shot:I
The changes in '65 changed the model description to the PA, I don't think the changes from Series 2 to 2A where anything much to write home about:I
The changes in '65 changed the model description to the PA, I don't think the changes from Series 2 to 2A where anything much to write home about:I
Hi All
Been here and there on the forum, though haven't updated my progress. Well to be honest not a lot has been done, lots of other things have kept me off the van for some time.
Some time back I finally retired my trusty rusty Datsun Sunny Wagon, at 590,000 km. Rust was becoming an issue, mostly cosmetic, but I was needing more space for moving things, which was the original reason I bought the Commer. I needed a van and ended up getting a 1993 Mitsubishi L300 van. I still intend to push on with the Commer, I just need something to bridge the gap.
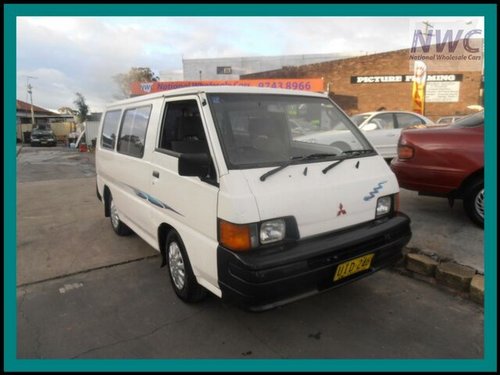
Now before I get branded a traitor, Let me explain that it isn't as bad a decision as you might think. Firstly and most important, it isn't a VW. Secondly It was cheap, running and registered at the time. Thirdly, it is a distant nephew to the Commer. Let me explain, as we all know, Chrysler/Dodge took over from Rootes many years ago, then here in Australia Mitsubishi took over the operations of Chrysler/Dodge. So I consider my L300 the Great Nephew of the Commer. Let’s be honest, all families have a relative that they don't talk about, marrying a "commoner" and producing offspring that were often disowned. Well that's me at the moment.
The L300 works well, though the torsion bar front suspension give a ride on bumpy road's not to different to what a Joey in a Mother Kangaroos pouch must feel like.
All was going fine until the temp gauge started running high and after checking things it looked like the sender or gauge were playing up. I continued on and though it did seem to be running a little hotter it seemed OK until when I lent it to a friend and it cooked itself on the expressway heading south about 100kn south of Sydney. The outcome was not good, totally cooked, scored bores and pistons and a knackered head.
As there are heaps of these vans in wreckers I thought a quick engine swap and off we go again, but trying to find one was another matter. those that were available had a zillion Km so I elected to have the motor rebuilt. Not the cheapest option and got in contact with the specialist that built my rally car motor and the motor for my old Sunny Wagon.
The new motor was needed to be a good street motor for a van, and built along a similar spec to the Sunny. I had been very disappointed with the fuel economy of the Std 2 litre 8 valve Mitsubishi motor, getting at best 20 mpg more often 16-18 mpg. I'm a reasonably economical driver and used to get 16- 18 mpg out of my Range Rover, so you can understand my disappointment with the van. You felt like you were flogging it most of the time for not a lot of action.
So I decided to use the rebuild as a test for the type of spec I want for the 2.4L Nissan motor I am planning for the Commer. Gaining power through improvements in the motor's efficiency, by letting it breath better.
The short motor was rebuilt, new pistons, bearings etc and is basically a stock short motor built by a specialist. The original head was beyond repair and replaced with a new one that is bog standard. I contacted a company call Camtech here in Sydney as they had an upgraded cam profile that gave good improvements in low down power and fuel economy, while retaining a smooth idle, sounded perfect to me. I had also bought a set of extractors with 2.25” outlet plus a 32/36 DGV Weber and adaptor to suit the standard manifold to get started. I cleaned up the manifold with my die grinder, as the production casting was very poor and rough, plus cut more of a tapper into the adaptor plate and manifold to reduce interference to flow for when the second barrel opened up.
"" />
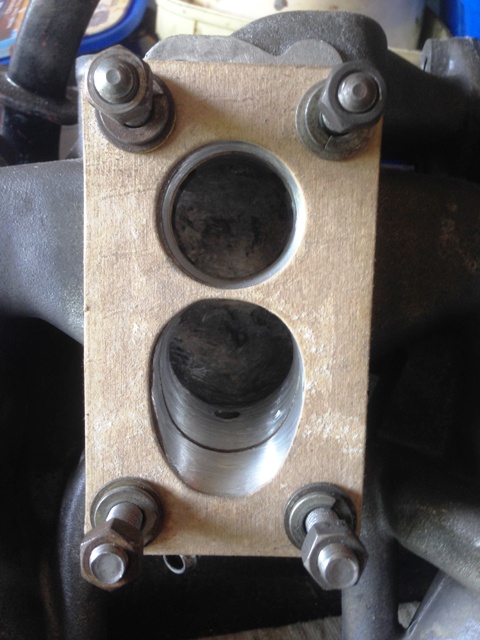
Once the cam was back in I put it all together and installed it back in the van. I bought a bunch of 2.25” mandrel bent exhaust fittings, some straight pipe, a Lukey free flow muffler plus resonator and set to work making the exhaust system. With everything now done, I added my running in oil and coolant and fired it up and have been knocking up the miles since.
To say I am pleased with the outcome would be an understatement. Everyday driving mostly requires just the first barrel of the Weber and only occasional the second, even when loaded. It revs to the red line if needed and is more than happy sitting on 3000-3500 rpm on the expressway. The exhaust gives it a pleasant note and not too intrusive in the cabin, though it would be worse if the rear load area didn’t have the layer of underfelt and carpet to soften the noise. The best thing of all is the fuel economy has improved to 25 mpg, and only drops to 22-24 around town when loaded and it is now quite fun to drive.
This confirms the spec the Nissan motor will be for the Commer and the importance of looking at your motor as a complete package. I know many of you have change to SU’s and fitted free flow exhausts, but the camshaft will still dictate the breathing of the motor. Standard cam grinds are such a compromise and the factory always goes for the most conservative option available. I know that a cam change in an overhead valve engine a major effort, but if you have the motor out or are rebuilding spend the extra money and get it reground, as it is the key that makes all other modification work.
On closing I will relate a brief story I was told when I was attending a course on Quality Assurance many years ago. The trainer was very well qualified and experience went back way before the term QA became what we know of today. He was a Pom and had done his early training at Ford in the UK and they were looking at improving production efficiency and seeing what other results they could get. He said they decided to build a 1600 cc motor using all standard parts from the factory and built by the guys that built the motors normally. The difference was they halved the design tolerances of the standard parts. The QA team did this by picking and measuring all the standard components and only used those that fell into the closer tolerances they had specified. Once the motor was built they took it plus another “normal” motor picked at random to the dyno for testing. The outcome was the Special motor produced about 5 hp more than the standard unit. Apparently the outcome was plans to attempt to reduce the previous tolerances in production. With the UK motor industry in chaos at the time, the trainer deciding to emigrated to Australia and was unsure what happened as a result of their work.
Cheers
Stephen
Been here and there on the forum, though haven't updated my progress. Well to be honest not a lot has been done, lots of other things have kept me off the van for some time.
Some time back I finally retired my trusty rusty Datsun Sunny Wagon, at 590,000 km. Rust was becoming an issue, mostly cosmetic, but I was needing more space for moving things, which was the original reason I bought the Commer. I needed a van and ended up getting a 1993 Mitsubishi L300 van. I still intend to push on with the Commer, I just need something to bridge the gap.
Now before I get branded a traitor, Let me explain that it isn't as bad a decision as you might think. Firstly and most important, it isn't a VW. Secondly It was cheap, running and registered at the time. Thirdly, it is a distant nephew to the Commer. Let me explain, as we all know, Chrysler/Dodge took over from Rootes many years ago, then here in Australia Mitsubishi took over the operations of Chrysler/Dodge. So I consider my L300 the Great Nephew of the Commer. Let’s be honest, all families have a relative that they don't talk about, marrying a "commoner" and producing offspring that were often disowned. Well that's me at the moment.
The L300 works well, though the torsion bar front suspension give a ride on bumpy road's not to different to what a Joey in a Mother Kangaroos pouch must feel like.
All was going fine until the temp gauge started running high and after checking things it looked like the sender or gauge were playing up. I continued on and though it did seem to be running a little hotter it seemed OK until when I lent it to a friend and it cooked itself on the expressway heading south about 100kn south of Sydney. The outcome was not good, totally cooked, scored bores and pistons and a knackered head.
As there are heaps of these vans in wreckers I thought a quick engine swap and off we go again, but trying to find one was another matter. those that were available had a zillion Km so I elected to have the motor rebuilt. Not the cheapest option and got in contact with the specialist that built my rally car motor and the motor for my old Sunny Wagon.
The new motor was needed to be a good street motor for a van, and built along a similar spec to the Sunny. I had been very disappointed with the fuel economy of the Std 2 litre 8 valve Mitsubishi motor, getting at best 20 mpg more often 16-18 mpg. I'm a reasonably economical driver and used to get 16- 18 mpg out of my Range Rover, so you can understand my disappointment with the van. You felt like you were flogging it most of the time for not a lot of action.
So I decided to use the rebuild as a test for the type of spec I want for the 2.4L Nissan motor I am planning for the Commer. Gaining power through improvements in the motor's efficiency, by letting it breath better.
The short motor was rebuilt, new pistons, bearings etc and is basically a stock short motor built by a specialist. The original head was beyond repair and replaced with a new one that is bog standard. I contacted a company call Camtech here in Sydney as they had an upgraded cam profile that gave good improvements in low down power and fuel economy, while retaining a smooth idle, sounded perfect to me. I had also bought a set of extractors with 2.25” outlet plus a 32/36 DGV Weber and adaptor to suit the standard manifold to get started. I cleaned up the manifold with my die grinder, as the production casting was very poor and rough, plus cut more of a tapper into the adaptor plate and manifold to reduce interference to flow for when the second barrel opened up.
"" />
Once the cam was back in I put it all together and installed it back in the van. I bought a bunch of 2.25” mandrel bent exhaust fittings, some straight pipe, a Lukey free flow muffler plus resonator and set to work making the exhaust system. With everything now done, I added my running in oil and coolant and fired it up and have been knocking up the miles since.
To say I am pleased with the outcome would be an understatement. Everyday driving mostly requires just the first barrel of the Weber and only occasional the second, even when loaded. It revs to the red line if needed and is more than happy sitting on 3000-3500 rpm on the expressway. The exhaust gives it a pleasant note and not too intrusive in the cabin, though it would be worse if the rear load area didn’t have the layer of underfelt and carpet to soften the noise. The best thing of all is the fuel economy has improved to 25 mpg, and only drops to 22-24 around town when loaded and it is now quite fun to drive.
This confirms the spec the Nissan motor will be for the Commer and the importance of looking at your motor as a complete package. I know many of you have change to SU’s and fitted free flow exhausts, but the camshaft will still dictate the breathing of the motor. Standard cam grinds are such a compromise and the factory always goes for the most conservative option available. I know that a cam change in an overhead valve engine a major effort, but if you have the motor out or are rebuilding spend the extra money and get it reground, as it is the key that makes all other modification work.
On closing I will relate a brief story I was told when I was attending a course on Quality Assurance many years ago. The trainer was very well qualified and experience went back way before the term QA became what we know of today. He was a Pom and had done his early training at Ford in the UK and they were looking at improving production efficiency and seeing what other results they could get. He said they decided to build a 1600 cc motor using all standard parts from the factory and built by the guys that built the motors normally. The difference was they halved the design tolerances of the standard parts. The QA team did this by picking and measuring all the standard components and only used those that fell into the closer tolerances they had specified. Once the motor was built they took it plus another “normal” motor picked at random to the dyno for testing. The outcome was the Special motor produced about 5 hp more than the standard unit. Apparently the outcome was plans to attempt to reduce the previous tolerances in production. With the UK motor industry in chaos at the time, the trainer deciding to emigrated to Australia and was unsure what happened as a result of their work.
Cheers
Stephen

That's known as engine blueprinting with selective assembly, and makes a difference
And you're dead right about the camshaft
"You,re only supposed to blow the bloody SLIDING doors off"
Founder of the 6 speed club
And you're dead right about the camshaft
"You,re only supposed to blow the bloody SLIDING doors off"
Founder of the 6 speed club
Had some time to have a play today. Have always been able to see faint writing on the side of my van, so thought I would grab some wet & dry and investigate. This is what I have found so far.
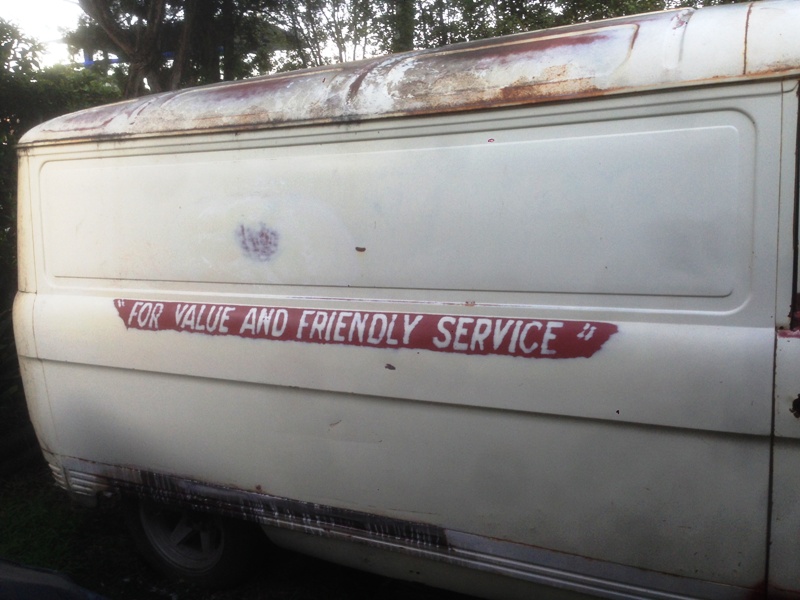
Will be seeing if something is written on the panel above. I know there is similar across the rear below the windows.
The writing seems to be on the red oxide undercoat as if you sand too much you get back to the steel panel.
Considering leaving it on the van. Anyone advise what clear coat would be best to coat it with, as there are small spots where it is just back to the metal.
Cheers Stephen
Will be seeing if something is written on the panel above. I know there is similar across the rear below the windows.
The writing seems to be on the red oxide undercoat as if you sand too much you get back to the steel panel.
Considering leaving it on the van. Anyone advise what clear coat would be best to coat it with, as there are small spots where it is just back to the metal.
Cheers Stephen