DODGE SUPERVISTA

Great news jim i was confident you wouldnt have any trouble but you never know with new builds when things start settling in. I want to see loads of pictures.
With the overdrive get a Hunter box preferably out of a humber sceptre mk3 or fastback rapier(slightly better ratios)and swop the bell housing and shaft over.
 
On the hunt(er) already for a box, think France is out of the question until that is in, will help my ears out. Either I or the van settled into the journey as seemed to get easier as it went on, got used to the gearing and pre-empting hills so she 'flew' up them. Was very suprised by the handling and stability - didn't flinch when coaches or lorries came past.

Plenty of pics to come, unfortunately the van is 30 mins away so will only be weekend work but still full on to get it ready for Summer.

Hasta la supervista baby
 
Congratulations ;)

4650583641_dba2503b41_o.jpg

"You,re only supposed to blow the bloody SLIDING doors off"
 
Thought I'd post up the first set of pics as finally got out to the van to start work. Bit of electrics and insulating, photos I'm sure will get more interesting as I move onto the interior fit and some mechanicals.

Insulation from Mr Williams going in:

insulation_zpsb203f735.jpg


Angel Eyes wored to the side lights. Little difficult to pick up on the pic but they look great when on with a yellowblue tint.

angeleyes_zps09641cca.jpg


Full beam, Halfords Ultra Brilliance. Mmmmmmm, a little brighter than the two sealed units that were similar to a torch with flatenning batteries

Fullbeam_zpsead2396b.jpg


More to follow after next weekend...

Jim

Hasta la supervista baby
 
Back home at last and the new gearbox working well, minus O/D at the moment, not sure the old one was broken now but at least I've got O/D on its way.
Made up the loom yesterday thanks to Andy's diagram so will get it on in the next few days to test. Bit of fettling to do with the carb as doesn't fully open up the Stromberg due to cabling issues but shouldn't be a big issue, just trying to work out how to get the cable to pull further round on the carb from the steel bar which is limited in it's travel - any ideas out there?
Interior now lined and ready for the fit out. Collected a few bits but just need the some for the interior electrics and a good sink, love a good sink me :) - any recommended kits for doing the interior electrics otherwise I'll buy a 2nd hand zig and 240v fuse box separately. Hopefully get some more pics up soon, just not very good at taking them:

Thanks for all the help so far

WP_20130425_00120130425092621201304251038031_zps302b4bbf.jpg
[/URL]


Hasta la supervista baby
 
You may get some more movement by re-positioning the bracket that holds the outer cable end so that the inner cable wraps around the quadrant more - if you see what I mean. I had a similar problem on Harvey's SU, I got round it by cutting and re-positioning a little tab washer that holds the quadrant in place - don't know if this method will work on a Strombie.

bth_IMAG0017.jpg

Summer's Coming
 
Never thought of that, I'll give it a go thanks but think it's pretty much round it all already. Was thinking of trying to add on a bigger quadrant to give more movement, last gasp will be to fit a lever onto the steel rod end to extent the pull - I'll get me Mechano out.

Hasta la supervista baby
 
that van is ace m8. thumbs up big tim. you'll soon get through all the little fettling jobs :)

7085000413_eb70a8423f_q.jpg

Dolly Commer Is Here http://66.129.69.181/forum/topic.asp?TOPIC_ID=6833
 
Shiny shiny new bonce...rebuilt with new exaust valves, cut seats, springs, valve guides (too much movement on the exhaust valves) a light skim - wasn't flat, went in the cleaner for two hours, rebuilt carb re jetted and sprung to standard single carb for the engine. Bit of manifold painting too, just a bandage to go on to keep the heat down for when I soundproof. Will be on over the weekend :). Should have most of the interior fitted by end next week, looking at a chap I know who started his own company to spray it up with this rubberised paint process, Interesting material. I'll keep you posted on what it looks like...enjoying getting me hands dirty again :D

43BDB21F-2658-4B79-8A52-4427B82B245E-3155-000001FF6938215B_zps60b1b237.jpg


EEC6727B-1E36-4473-BB9D-264A097E434C-3155-000001FF730AED99_zps8fd82ca4.jpg


Hasta la supervista baby
 
Nice bit of progress Jim :p but do yourself a favour and get rid of that air filter, it's utter crap and is restricting the engine ;)

4650583641_dba2503b41_o.jpg

"You,re only supposed to blow the bloody SLIDING doors off"
 
Was thinking that...had a look for a different ones online but all i could find was the same for a Stromberg. Does martins kit fit one or just for carbs with a lip (for the piping to go onto)?

Hasta la supervista baby
 
Been doing a bit more work prior to the camping holiday in August, engine back together and running sweet. Think it's not breathing great so maybe an air filter change at some point, plods along with very little pedal but under acceleration feels strangled, maybe just the weightengine combo. She traps along at 60 happily enough though. Still not getting the last 1/4 turn on the carb despite making an extension bar on the link next to the radiator, back to the drawing board there.

Manifold wrap completed - a tough job on these as there's isn't the holes on all cylinders to wrap through, got there in the end though and makes a significant difference, can easily touch it now without problem. Wish I'd realised it was glass matting before chopping it in the house - took 30 mins for the itching to start and been hoovering ever since :)

WP_20130706_001_zpsbf2c4208.jpg
[/URL]

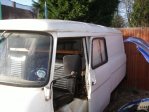
Fitted, sound insulation in place, electronic ignition and coil fitted and a new heater outlet drilled and tapped into the head ready for piping.

WP_20130706_004_zpsd1165b6c.jpg
[/URL]

Still to do before hols:

Remote servo to install
Seatbelts to install
Gearing to fettle - think just needs a greasing on the new bushes
Accelerator to fix
Roofrack to fit
Interior to complete - one more cupboard, side boards. Curtains and seats being made at moment
Full electrics and gas to put in
Spare wheel holder to fit.

Off to Whitby tomorrow for a significant test run and to measure the MPG - wish me luck!

Martin might pop into yours on the way for some bits and advice :)


Hasta la supervista baby
 
That looks so good[^]
Is there any way the quadrant on the carb can be turned slightly? that's another way you could get more travel - or drilling another hole in the crank on the linkage at under the accelerator pedal.

bth_IMAG0017.jpg

Summer's Coming
 
Nice :p but get rid of that filter for a GENUINE K&N ;)

Drill another hole for the rod, closer to the pivot point on the arm mounted on the rad :)

4650583641_dba2503b41_o.jpg

"You,re only supposed to blow the bloody SLIDING doors off"
 
Cheers guys, will try tomorrow for the accelerator stuff, she'll fly with full travel ;)

when you say a genuine k and n I can only find them that look the same size and shape as this one that'll fit a Stromberg. So is not a genuine one or you mean fit a cone one and make a plate with a lip to allow it to fit? Or would a k and n pan shape work better? Sorry if a daft question!

Hasta la supervista baby
 
Back
Top