
You are using an out of date browser. It may not display this or other websites correctly.
You should upgrade or use an alternative browser.
You should upgrade or use an alternative browser.
Back of the garage
- Thread starter Panky
- Start date
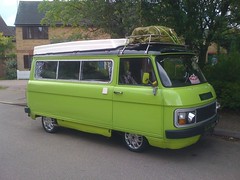
Looks really great ther panky. Did you paint the grill as well or is it the light?
I just need a good rootes...
I just need a good rootes...

You're so kind[8)]
I've been having a go at the exhaust manifold as it was blowing like a pig [xx(] I found that one of the down-pipe flange studs had sheared and someone had forced an over-sized stud into the hole - it didn't work very well:I Nothing for it but take the manifold off, one particular grotty bolt sheared off and I had visions of taking the head off to drill it out[V] There was only about half an inch left sticking out, too short for my stud extractor, so I ground a couple of flats on the stump and hammered a 1/4" drive socket over it. I put the stud extractor onto the socket and turned it - to my amazement the broken stud came out - phew")
The stripped out stud hole was a right old mess and when I was drilling it out to re-tap it a chunk of the casting broke away Nothing for it but to weld the stud in, I know using a mig on cast iron isn't a good idea but needs must and it appears to be strong enough. Everything went back together and I started the engine up, still blowing, the sealing ring has split(luckily I ordered one from Martin) I left it running for a while to warm up but it was very lumpy on tick-over, I noticed that the little manifold drain pipe was missing so I stuck my finger over the hole, the engine settled out and ran lovely and smooth[^] (even though I burned me finger:I) so a suitable bolt was found to block the hole up

Summer's Coming
I've been having a go at the exhaust manifold as it was blowing like a pig [xx(] I found that one of the down-pipe flange studs had sheared and someone had forced an over-sized stud into the hole - it didn't work very well:I Nothing for it but take the manifold off, one particular grotty bolt sheared off and I had visions of taking the head off to drill it out[V] There was only about half an inch left sticking out, too short for my stud extractor, so I ground a couple of flats on the stump and hammered a 1/4" drive socket over it. I put the stud extractor onto the socket and turned it - to my amazement the broken stud came out - phew
The stripped out stud hole was a right old mess and when I was drilling it out to re-tap it a chunk of the casting broke away
Nothing for it but to weld the stud in, I know using a mig on cast iron isn't a good idea but needs must and it appears to be strong enough. Everything went back together and I started the engine up, still blowing, the sealing ring has split(luckily I ordered one from Martin) I left it running for a while to warm up but it was very lumpy on tick-over, I noticed that the little manifold drain pipe was missing so I stuck my finger over the hole, the engine settled out and ran lovely and smooth[^] (even though I burned me finger:I) so a suitable bolt was found to block the hole up
Summer's Coming
I owe you manifolds don't I?!
"Not tonight love - I'm varnishing me roofrack"
www.littleyellowcar.co.uk
"Not tonight love - I'm varnishing me roofrack"
www.littleyellowcar.co.uk
well i sudedenly realized that i was starting to forget some of the hints and tips in this thread. every time i read it i think to myself "if i can do half as well as you i will be well happy" well done mate this is an epic thread thinking about it dolly is running a bit lumpy and my manifold has the manifold drain pipe with an su carb. maybe i should try blocking it will be going back to look at how you sorted your peak out now, dont suppose you know the page number? lol
Dolly Commer Is Here http://66.129.69.181/forum/topic.asp?TOPIC_ID=6833
thinking about it dolly is running a bit lumpy and my manifold has the manifold drain pipe with an su carb. maybe i should try blocking it will be going back to look at how you sorted your peak out now, dont suppose you know the page number? lol
Dolly Commer Is Here http://66.129.69.181/forum/topic.asp?TOPIC_ID=6833
Stick your finger over the end of the drain and see what happens. The bent peice of pipe was actually missing on Bonnie so the was an 1/8" hole sucking in air[xx(]
Starting page 21 But there are others who have done a much better job - the repair panels weren't available when I did my peak repair.
Summer's Coming
Starting page 21
But there are others who have done a much better job - the repair panels weren't available when I did my peak repair.
Summer's Coming
Wow mate she is looking brilliant. Always rate your work as you well know but this is looking incredible. I'm embarrassed at my lack of work on Pia in comparison!
Guess who's back, back again Comm - Don's back Tell Your Friends...
HAHAHAHAHAHAHA!!!
All Hail The Mighty Bushpig!!
Guess who's back, back again Comm - Don's back Tell Your Friends...
HAHAHAHAHAHAHA!!!
All Hail The Mighty Bushpig!!
quote:
Originally posted by Panky
Well now you're back, back again - get stuck in and show that Comm-Pete how it's done
I'll tell my friends.
Summer's Coming
Well i have a week off next week let's see what i can get done
Guess who's back, back again Comm - Don's back Tell Your Friends...
HAHAHAHAHAHAHA!!!
All Hail The Mighty Bushpig!!
After sorting the exhaust manifold out (thanks Rupert)it was time to get back to the bodywork.
Plenty of grot on the bottom of the passenger side door[xx(] But not too bad


First cut is the deepest
you can see where I ground through the edge of the door skin at the bottom of the pic, then a few spot welds to drill out and off came the grotty bit of skin.

I was chuffed that the bottom of the frame was mostly solid with just a couple of areas to repair.

Aha, so that's why the window decided to drop into the door:I Easy fix

Lots of Aquasteel splashed about

Repair sections let into door bottom

The repair panel already has a joddled edge and self tappers hold it in place initially before tacking up and the holes plug welded

A skim of filler then lots of rubbing down, primed, painted and back on the van (haven't got a pic of that[8)])

Now I had a right old job getting the screws our of the drivers door, I even bought an electric impact driver and while it shifted the passenger side screws brilliantly some of the drivers side just would not move. So a little bit of trickery required
I blobbed weld onto the screw heads until I could hammer an old socket on and out they came - I even chopped the pigeon poo off, re-cut the groove and re-used the screws

I decided to cut the drivers door lower down, this side was better than the other so why chop out perfectly good metal (it also makes it easier to hide the joint, cos I'm rubbish at bodywork[8)])
Similar repair to door bottom carried out

Welded, skimmed and primed

A coat of colour before re-fitting the door.

Both doors are now back on and painted - I'm quite pleased with the drivers door but the other side needs more work on the joint, I was a bit generous with the filler and it shows in the daylight:I
Summer's Coming
)it was time to get back to the bodywork.Plenty of grot on the bottom of the passenger side door[xx(] But not too bad
First cut is the deepest
you can see where I ground through the edge of the door skin at the bottom of the pic, then a few spot welds to drill out and off came the grotty bit of skin.
I was chuffed that the bottom of the frame was mostly solid with just a couple of areas to repair.
Aha, so that's why the window decided to drop into the door:I Easy fix
Lots of Aquasteel splashed about
Repair sections let into door bottom
The repair panel already has a joddled edge and self tappers hold it in place initially before tacking up and the holes plug welded
A skim of filler then lots of rubbing down, primed, painted and back on the van (haven't got a pic of that[8)])
Now I had a right old job getting the screws our of the drivers door, I even bought an electric impact driver and while it shifted the passenger side screws brilliantly some of the drivers side just would not move. So a little bit of trickery required
I blobbed weld onto the screw heads until I could hammer an old socket on and out they came - I even chopped the pigeon poo off, re-cut the groove and re-used the screws
I decided to cut the drivers door lower down, this side was better than the other so why chop out perfectly good metal (it also makes it easier to hide the joint, cos I'm rubbish at bodywork[8)])
Similar repair to door bottom carried out
Welded, skimmed and primed
A coat of colour before re-fitting the door.
Both doors are now back on and painted - I'm quite pleased with the drivers door but the other side needs more work on the joint, I was a bit generous with the filler and it shows in the daylight:I
Summer's Coming
Moffatt here we come
http://www.commervanspares.co.uk/
http://www.yorkshireclassiccampers.co.uk/
http://www.commervanspares.co.uk/
http://www.yorkshireclassiccampers.co.uk/