Back of the garage

You're too kind[8)] I get by with what I've got and have learned just to have a go - if it's broke you can't break it anymore so what the hell;)
The most important bit is the reamer, an R-10 if I remember correctly , and a decent sized tap wrench is better than a spanner to turn it with. Don't try and ream it out all in one go but set the reamer up so it just fits in the bore a then expand it 1/4 of a turn on each pass until the pin is a gentle tap in fit, job done[^]

41fa30c8-22ce-43e8-bd12-188475a80292.jpg

Founder of the Non-Facebook Club
 
Thanks, will do:)
quote:
Originally posted by Panky

You're too kind[8)] I get by with what I've got and have learned just to have a go - if it's broke you can't break it anymore so what the hell;)
The most important bit is the reamer, an R-10 if I remember correctly , and a decent sized tap wrench is better than a spanner to turn it with. Don't try and ream it out all in one go but set the reamer up so it just fits in the bore a then expand it 1/4 of a turn on each pass until the pin is a gentle tap in fit, job done[^]

41fa30c8-22ce-43e8-bd12-188475a80292.jpg

Founder of the Non-Facebook Club


commer+018.jpg


Rain, hail or shine a Commer adventure awaits,,
Mount up!.

www.commervanoztour.blogspot.com
 
We likes getting mucky[}:)]
After the success in 'uprating' Ted the Traveller's suspension simply by putting heavier oil in the Armstong dampers I decided to see how it worked on Harvey:) Easy job and well worth the effort, two bolts and a little ball joint on each rear damper and they're off. You will need an 18mm socket and spanner and a ball joint cracker (the ball joints separated easily).
One off and on the bench after a quick clean up with a wire brush


CCBXmNV.jpg


The old oil was drained off (there wasn't much of it, it was like water and it stank[xx(]) and the damper flushed out with clean oil. Not a lot to them, these are all the bits you need to worry about

WAE5Tt5.jpg


Be careful when you take the drain plug out as it contains a valve, the larger spring usually stays on the body of the damper but it comes out easily so don't loose it. There are also two thin shims/washers under the spring which can get lost when cleaning the valve.

HDirrYc.jpg


The valve needs priming before filling the damper simply by filling the drain plug hole up before re-fitting the valve. Then clamp the damper in a vice by one of the fixing lugs and pour the new oil in the top working the lever up and down to expel any air from the pistons, there is a lot of resistance once the oil has filled all the mechanism. Fill to about 1/4" from the top and put the lid back on - job done:)
The difference is very noticeable and Harvey runs a lot firmer on his springs, cheap and easy to do, significant improvement in ride - what's not to like[8D]
This is what I used to re-fill them, straight SAE 50 - about £8 for 1 litre off ebay (couldn't find it locally) each damper takes about 100ml so there's enough for 10 dampers, plenty left for me to re-do Ted's and Bonnie's:D.

yAXBlWB.jpg
 
Last edited:
how odd - the one job i really am puzzled by and i randomly clicked a page and it came up.. the main pivot pin/bush.

can you shed some light on the reeming. not had to reem anything before. where can i get the apropriate reemer or what do i need to ask for. am i aiming to just reem enough to let the pin slot in with no play at all.

many thanks.

p.s. sorry my keyboards broken so lacking some punctuation and caps
 
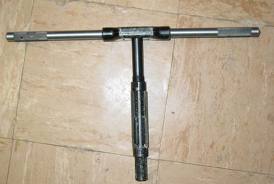
The reaming is very simple once you get the right one. They come in different size ranges and the one I used (R-10) covers the range needed to open the bushes up to the right size.
The manual states they should be reamed to between 0.876" to 0.877" (22.25mm to 22.275mm)

This is what one looks like with a tap wrench to twist it.

20141022225322_reamer.jpg


They adjust by backing off a collar on one side of the reamer and tightening one up on the other end, this pushes the reamer cutting blades along a tapered groove so increasing the diameter of the cut. The way I do it is to slacken the reamer off and push it into the bushes then adjust it so it just starts to make contact, then increase the reamer by 1/4 turn on the collars for each pass through. Eventually the pin will just start to enter the end of the reamed bushes so you need to be extra careful with tiny adjustments to the reamer to get the fit just right.

41fa30c8-22ce-43e8-bd12-188475a80292.jpg
 
Did a quick google and found this one, I'm sure you can find cheaper.

http://www.rdgtools.co.uk/acatalog/ADJUSTABLE-REAMER--RANGE-27-32----15-16------MEDIUM-SET--H10-829391L.html

41fa30c8-22ce-43e8-bd12-188475a80292.jpg
 
they seem to jump up to about 20odd quid over the smaller ones. think i've pushed my luck quite far enough with the local garage tool blagging... maybe just one more :)
 
Doing my shocks now, replacing them with Romeos ones that dont leak and appear a lot better that mine. might try the SAE50 in them. Then have a go at rebuilding mine as spares.;)
Thanks for the heads up Panky.:)

DSC00699.JPG


www.commervanoztour.blogspot.com
 
We covered over 350 miles at the weekend and the dampers performed very well[^] A lot more stable on the road, smoother ride and motorway tramlines didn't seem to bother the van half as much as before:)

41fa30c8-22ce-43e8-bd12-188475a80292.jpg
 
Been tinkering:)
There's always people coming on the Morris Minor forum with the same problem - oil passing the crankshaft 'seals'. Now a Minor has a similar set up to the Commer engine in that they both rely, partially, on scrolls machined into the ends of the crank to 'screw' the oil back into the sump but if the breather is blocked, or the engine is breathing a little heavily, both vehicles are well known for marking their territory:( The later Minor has a closed circuit breathing system where a pipe from the crankcase is connected to the vac connection on the carb and I've got to say it works very well as the only leak from Ted's engine is from a tappet chest cover gasket, when I dropped the gearbox the other week the bell housing was bone dry inside, not so Bonnie:eek: So I cobbled a Minor type system together, I simply ran a hose from the engine side breather through a reducer and, as I've done an SU conversion, onto the vac connection on the carb, the effect was instant. Before when I revved the engine you could feel a slight blow from the rocker cover oil filler, now it actually pulls a slight vacuum so all the fumes are being drawn into the carb and burnt off (not that there was much to begin with) but the main advantage is that the crank end scrolls are under slightly negative pressure so shouldn't leak and hopefully that oily patch where Bonnie lives wont need cleaning up as often:D
I've also fitted a later rocker cover with a non-vented cap (thanks Bernie) and a connection that would normally go to the air filter (gungy elements:() but I'll be connecting that via a T piece to the vac line as well. Next I'll gather some bits and do a proper job and report back with pics.
I suggested to Paul JL a little while ago that he should try it, and what do you know it worked for him too:)
 
I've gathered the bits and put together a closed circuit breather system for Bonnie.
The bits.
The 'U' bend, 1 metre of tube, elbow and flame trap (Landrover) came off Ebay and the reducer was bought from the local aquarium shop. The elbow is blue because it was cheaper:rolleyes: and there was just enough tube for the job


All fitted in a few minutes, and there are a couple of handy clips on the bulkhead already there to hold it all in place.


Connected to the side breather tube.


It works a treat, you can feel a slight draw inwards at the filler cap so all those engine fumes are being drawn away and burned, and best of all the slight negative pressure on the engine should help with those annoying little crankcase drips:)
I need to keep an eye on the 'U' bend to make sure it doesn't fill with oil but I think the system will work if the side breather is blocked off so it's just relying on the rocker box connection. I'm going to do the same on Harvey (but with a PCV) and his engine doesn't have the side breather so we will soon see.
 
Harvey came out of hibernation and got a wash and polish:)

20160506_122955.jpg

But what's this, a bit of grot:eek:

20160506_123018.jpg


Out came the knotted wire wheel and it wasn't pretty so the wire wheel was changed for a cutting disc

20160506_143250.jpg

Note my relaxed stance:)
I had to do a repair to and old repair to the inner cill

20160506_160406.jpg

But what about the outside bit, luckily I kept the good bit of one of Bonnie's door bottoms when I replaced them

20160506_123122.jpg

Which was duly cut and bent to fit the hole in Harvey

Tacked in and still relaxed:)

20160506_161353.jpg

Welded in, cleaned up and primed

20160506_165623.jpg

Still a bit of fettling to do before paint but at least it's good metal:cool:
 
Back
Top