Retro Andy’s second van; One owner 43 years :-)

Another 2am finish, I’m pooped and I’ve run out of marine ply :-( at least the first centre cross brace dropped in fine and my highwayman is now booked in on the 30th for new brakes and engine stuff :) :) :) 
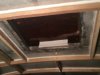
Sh#t 18 days to get it ready to move ;-0
 

Attachments

  • 812251F4-9EAA-4F2B-B110-B37CE31832FE.jpeg
    812251F4-9EAA-4F2B-B110-B37CE31832FE.jpeg
    981.6 KB · Views: 57
Don’t you just love a fresh rack of ribs :). Out with the old and in with the new. All marine ply woodwork now cut. I’m using several sealants on this roof rebuild. Heard of CT1??? It’s super strong, waterproof and also flexible. It can also be used in the wet too... You could cut a Stanley knife slot into the side of a full plastic water tank and it would seal it and cure dry. They are very choosy who they let stock it but its good stuff and worth tracking down. £12 a tube so use it wisely. I’m on my second tube :-( The demo heavy block using CT1 even has a cup full of water glued to it.
Progressing up the other side of the roof now with new ribs with centre bracing starting to go in too. It’s slow going though keeping everything string lined up as the roof was badley buckled and I need to keep the sides and windows lined up too. Have also decided to put two super large orange Perspex opening hatches into my roof to really open the van up, a bit VW Samba. Designing additional bracing for the centre section to give it strength to the centre between the two new hatches to stop the roof folding in. Got to work out how to curve/form Perspex next. Going to be doing something with underfloor heating and also use roof insulation that deflects heat back outwards as well as keep heat in as will prob end up taking the Highwayman over to Spain for a while. Watch this space :) Retro Andy
 

Attachments

  • F2F3EBF2-DAEB-436E-94CC-15E1C24DC275.jpeg
    F2F3EBF2-DAEB-436E-94CC-15E1C24DC275.jpeg
    802.4 KB · Views: 56
  • 707BEE7C-B747-43EF-A94E-C177A2E51CBE.jpeg
    707BEE7C-B747-43EF-A94E-C177A2E51CBE.jpeg
    1,014.4 KB · Views: 49
  • 00198224-B05A-4CA7-A1DF-E390820960C6.jpeg
    00198224-B05A-4CA7-A1DF-E390820960C6.jpeg
    981.6 KB · Views: 47
Lots of bracing around new opening hatches having to go in and having to relocate some rib positions.. it’s slow going...
 

Attachments

  • 7E0B53F3-3559-44F4-9992-F91D8062E5C2.jpeg
    7E0B53F3-3559-44F4-9992-F91D8062E5C2.jpeg
    547.6 KB · Views: 54
. Got to work out how to curve/form Perspex next. Going to be doing something with underfloor heating and also use roof insulation that deflects heat back outwards as well as keep heat in as will prob end up taking the Highwayman over to Spain for a while. Watch this space :) Retro Andy

Good work Andy. Pay yourself back with some early nights in the van when you have it finished.

Bending perspex...................I used to hold it in front of an old fashioned electric fire, then bend it around a former when it got soft. You can do it with a hot air gun but getting the heat even without deforming it is a problem with anything but small areas. Any kind of heat lamp would work OK though. You'll need a temperature between 75 and 95C, so steam might work.

For roof insulation there is some stuff called "TRISO-SUPER 10+" which is multi layer foil reflective, and won't absorb water. It should really have an air gap either side (for building regs compliance) but in a van this wouldn't matter. You can just staple it to the ribs and ply straight over it. Demon stuff but relatively expensive.
 
CT1 is good. I have seen the ‘reps’ demo block. They do different types of gunk. Triso is good but it isn’t ‘bonded’ ie if you cut panels of it and had nothing to staple it to it will delaminate, so awkward if you wanted to stick it onto the sides etc, unless you sewed the edges, but then it would loose its vapour barrier properties
 
Thought I would post a sneak preview of my Highwayman in situ as it’s about to move off the old boys drive for the first time since 1994 and back into Commer world.. Holly sh#te. Yep, Forrest Gump was in the cinema then and Blur battled it out with Oasis in the charts. If only all this roof carpentry was easy, life would be as Forrest would say, like a box of chocolates. Maybe this Highwayman could foresee the rise of the Internet and went into hibernation. Anyhow, jeeez, must stop rambling, all this wood glue has gone to my head. Anybody out there got a spare front bumper and any go faster low comp bits. Carpentry to roof done, now working on the sides/corner. It’s all coming on well, will post some shots soon of that... Retro Andy
 

Attachments

  • 379C18C0-B3DB-480C-AEA6-D901DD2A0A13.jpeg
    379C18C0-B3DB-480C-AEA6-D901DD2A0A13.jpeg
    629.7 KB · Views: 48
Yep 5 weeks in and the van roof is complete. Yeeeeee Haaaaaaa. I’ve actually lost a stone in weight with all these late nights and weekends with no tea or beer, commertastic. So me and the van are fighting fit. Also had to rebuild the rear side, corner and rear panels including door post with extra bracing by the rear window and roof where I’m installing two large feature orange sunroofs which should look awesome internally. I’ve been chasing rot for a month plus but supports now removed and the roof stays up. Its ready to move for the first time since 1994 :-0. Holly sh#te!
 

Attachments

  • 1EC58D71-31FC-4BF5-A826-95A9B6FFEFBF.jpeg
    1EC58D71-31FC-4BF5-A826-95A9B6FFEFBF.jpeg
    1.1 MB · Views: 42
  • 97643BA3-AA47-46F6-9C04-71AA336AE3E1.jpeg
    97643BA3-AA47-46F6-9C04-71AA336AE3E1.jpeg
    969.1 KB · Views: 39
  • 60D5F571-CBCC-4B88-B5E3-B061BF4925DF.jpeg
    60D5F571-CBCC-4B88-B5E3-B061BF4925DF.jpeg
    1.1 MB · Views: 53
Lovely work. Got an original cooker for one of these or I think it is anyhow. Same as in Christins new ride, in excellent condition considering age. No grill pan or oven shelves not sure if of interest?
 
Well countdown to the garage complete, it’s last pull onto the drive in 94 and within moments the recovery driver had measured the once saplings, now full sized trees, concluded it would miss the branches, jumped in, rolled it down the drive with no brakes into the main road and half up and onto the low loader.
The old owner had tears of sadness, the long suffering wife, tears of joy, the neighbours, a collective cheer.
It looked so big on the drive, so dinky toy on the road, but totally totally fabulous all the same...
 

Attachments

  • 14ECAA25-C65F-463D-948C-D549769ECE80.jpeg
    14ECAA25-C65F-463D-948C-D549769ECE80.jpeg
    969.8 KB · Views: 40
  • E12EC7D5-D42D-4D6A-9896-D882DD7C9596.jpeg
    E12EC7D5-D42D-4D6A-9896-D882DD7C9596.jpeg
    893.9 KB · Views: 40
  • 536ADC7E-6D3C-4BA3-9D2F-0BC39D194099.jpeg
    536ADC7E-6D3C-4BA3-9D2F-0BC39D194099.jpeg
    759.9 KB · Views: 43
I realise it must have been sad for the previous owner to see it go, but he has the satisfaction of seeing the hard work you are putting into it to get it back on the road. The neighbours will miss it! ;)
 
Well, she, she? Who said she was a she? made it to the garage but unfortunatly I was turned from a bouncing Labrador puppy to an old tired goat. Conversation with Dennis who owns the garage and was the one who put me onto the Highwayman in the first place went something like this.... Me.... I want the head skimmed, SU carb conversion, 4 Branch manifold, alloy tank, free the clutch, change he clutch master cylinder and replace the brakes... Simples.... Dennis, looks up and down he van in disbelief and says, when was the last time it was run... Me,1994.... Dennis.... let’s just start with getting it running shall we. Mmmm my dream of Nurburgring disappears in an instant. So here she sits, engine cover up with Dennis formulating a list of parts. Think I will polish the front grill this weekend, that’s bound to make it go faster...
 

Attachments

  • 49776B6C-F609-4396-A6AD-7F2DD587D83F.jpeg
    49776B6C-F609-4396-A6AD-7F2DD587D83F.jpeg
    882 KB · Views: 30
Back
Top