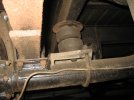
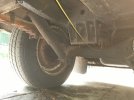
Pootle's rear is sagging....

Pootle's Owner

Active Member
- Like me, it's probably age related!
OK so engine rebuilt, overdrive gearbox rebuilt and rewiring is progressing...
So shortly I'll need to consider sorting the rear springs which are basically flat at this point.
What options are there around for fixing the problem?
- Get new springs made?
- Get old ones stripped/rebuilt/re-tempered?
Any recent experiences with this?

This is on ebay at the moment and I would go to have a look on the off chance the diff and/or springs could be of use if it weren't for lockdown...
Anyone know if any of this would be applicable to a Commer?


Cheers
Tony
 
I’d assume the springs are for a much lighter vehicle than a Commer. Getting yours re-tempered is a safe way to go as you know what you’re getting at the end. Shouldn’t be too expensive either
 
Hi Tony and fellow Tourstar owner, we fitted Aeon Hollow Spring Assistors to help with the load. A guy came to the house to fit them. We picked a medium rubber but there was a harder option. I do have a spare set of springs yet to fit, but the spring assistors certainly do help, I hope this helps
Regards Colin
 
I had Bonnie's re-tempered and an extra leaf put in a few years ago. They have dropped a little since then but are still OK - I would agree with Colin and fit some of the Aeon spring assistors. I'll get round to it one day too.
 
Try this website ride-solutions.com I believe it was David from Cambridge (who is not far from us) who came out and fitted the assistors. The web page explains how they work

Yes that's what you need.
To be more precise.............Timbren rubber springs type 530-65 (that refers to a rubber spring in 65 shore hardness)...........
........and this is how they are fitted.
IMG_2286.JPG

These were fitted from new on my van. I don't think the standard springs will ever be strong enough to support the rear overhang of the coachbuilt van without the assisters. I think you can get the plates from Ride Solutions as well. If not they're easy enough to fabricate out of a bit of steel. You can see that the rubbers are fixed to the axle plate and there's little or no gap between them and the chassis rail.
 
Hello all

OK so after a recent 1000 mile trip around Somerset and S.Wales, it’s time to look at Pootle’s soggy rear end….

The springs have essentially collapsed as can be seen here;

pic1.jpg

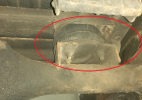
Currently the axle is sitting on some old rubber ‘springs’ which are more of a ‘bump-stop thing I suspect as they are pretty short? Are they original fitting or later addition?


pic2.png


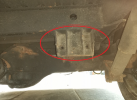
There are a couple of chassis mounted vertical brackets just in front of the bump-stops that don’t have anything bolted to them – what are they for?

pic3.png


The question is, what is the best way forward here? The springs look pretty badly rusted so I imagine new ones are required rather than refurbishment of the originals? Anyone had any made or can springs from something else be used? I can get some assistors from ride-solutions but, looking at the springs, I imagine I need new springs and assistors?

Advice and opinions please.

Cheers

Tony
 
I always thought Pootle had air assisted rear suspension, what's fitted doesn't look like the usual Aeon spring assisters that some have fitted so maybe she is, and she's fitted with a telescopic damper conversion. The brackets you show are the original Armstrong lever arm damper mounts.
I got Bonnies springs re-tempered about six or seven years ago, and had an extra leaf put in ay the same time, but now they've sagged again so need re-doing. I used Mancunian Spring in Stockport, they may be able to make new ones from scratch but I would think they'd need one for a pattern. Martin may be able to help in that area.
 
Well it's been a busy day and only Level 4 on the swear-o-meter!
I found the air valve for the rear assist bellows and, as advised, they do work if you add air! Not sure what pressure is needed but put 35lb in and got the rear level. Will be interested to see how the pressure holds up. Still need to progress spring replacements though.
After recent holiday it was clear the old exhaust system was scrap so I removed it and will make up a replacement from stainless.
Unfortunately of course, in removing it I snapped a stud on the downpipe so....
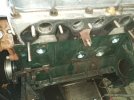
Off with carbs and inlet manifold and off with exhaust manifold to remove stud and fit a new one....
That was OK but I could then see that one of the core plugs was weeping so......
Removed starter and alternator and four core plugs from the side of the block....
I then spent a couple of hours with bits of wire, air line, water line and lots of poking to get a a jar full of crud from the waterways before fitting new core plugs...IMG_20210911_154507_resized.jpg
I'm now waiting for some brass nuts before refitting the manifolds to avoid any more broken studs!
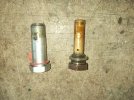
So whilst sorting problems I'm looking at oil pressure problems and have a new pressure control valve from Speedys (Martin didn't have one).
TheIMG_20210911_170557_resized.jpg

The problem is my original one from the 1966 Alpine engine is on the right but the replacement on the left won't fit the ali block on the engine...
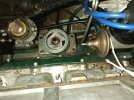
I wanted to remove the mounting block from the engine to examine it but can't get it off...
IMG_20210911_170032_resized.jpg

Here it is with oil filter removed and four mounting bolts removed. Anyone advise how it comes off? Is there a hidden bolt perhaps down the centre filler mounting point?
Any ideas about the two valve types? Neither seem a great design and a ball-valve with a screw adjuster would seem a better scheme - my original valve seems particularly crap and I really want to examine the ali mounting block to see how effective it could ever have been as a valve as it seems unlikely to have ever been an effective seal!
 
It's just stuck on the gasket, no more bolts involved. Sorry can't identify the new valve, only ever seen the type on the right.
 
Well we've progressed a way on Pootle. New stainless exhaust fettled and fitted onto Alpine downpipe - all stainless fittings, screws and brackets with full rubber mounting so it 'should see me out'! It does sound rather 'sporty' perhaps but compared to my 1974 Moto Guzzi it's actually pretty quiet... With the new core plugs and cleaned waterways the engine temp sits around 80-85 degrees which is good. I haven't replaced the oil pressure relief valve yet but have filled engine with 20/60 oil which helps a little with oil pressure - now around 40lbs/sqin but need to see what I get after a 20 or 30 mile run. As we are now facing the doom of no lorry drivers and petrol, I drained Pootle's tank this morning and put the petrol into my car for work. I then removed the rusty old tank that I bodged up 18 months ago (loads of brazed brass patches and epoxy lining) and dug out the ali tank we got from Tim last year. It really is an excellent bit of ali fabrication but I was a bit nervous about struggling under the van to fit it. When I had been trying to stop the old one leaking I had spent hours fighting rusty screws and threads but I retapped the 5/16 mounting bushes and the new tank fitted perfectly. It actually took longer to drain the old tank than fit the new one! Whilst under the rear end I checked the air suspension bellows and they are still inflated around 35lbs so that's a good sign after a couple of weeks. I have taken pictures and measurements of the springs and am currently trying to perhaps get some new ones fabricated as the ones currently fitted do look pretty bad - shame they are only 2" wide as this really is too narrow and it would be much easier to get replacements if they were wider.... Looks like we are pretty close to having the main running gear all sorted - engine starts instantly and runs well, overdrive gearbox is magic and everything looks pretty good now. The rewiring of the van is now complete apart from the mains wiring which needs to be replaced then it's on to sorting out water pipes, tanks and pumps which should keep me busy a bit over winter. The biggest challenge then will be looking at bodywork/paintwork and fibreglass roof - might even have to reskin the doors if the bottom edges are shot and that could be a bit of a challenge for my welding bodgery! Looks like owning a Commer is a life-sentence! :)
 
Great progress wil encouraging results. Martin has just produced the first of his new door skins and they are a thing of beauty with all the right compound curves and creases in all the right places. He also does door bottom repair panels and I'm about to buy some for Harvey
 
Well nothing done on Pootle over the winter other than topping up charge on batteries and sourcing new leaf springs. I had some new uprated ones made by Jones Springs in Wednesbury and can't praise them enough! I discussed the springs with their man Kev and confirmed the sizes they had in their records - added an extra leaf and beefed things up a bit. They wouldn't accept money until I had received them and accepted them as OK!!! Springs arrived in Jan and i have been putting off the task for fear of jacking it all up on 20 degree sloping drive.... Bit the bullit yesterday and once it was all raised up at the back the job wasn't that bad..... Test drive today...
 
Did a short 15 mile trip today to confirm rear axle didn't drop off! All went well and rear end much improved. Replacing core plugs and rodding the water jacket gave great results and engine now runs cool (80 to 85). The new stainless wide bore exhaust with a small silencer is quite 'rorty' which seems odd for a Commer but far better than the rusty blowing old setup! Still have opportunities to shine as weather improves..... fit new 240v wiring, sort water pipework/pump, fit a new fridge then start looking at bodywork, replace oil relief valve in hope of raising oil pressure... Will it never end?
 
If oil pressure valve doesn't raise pressure, is it possible to drop the sump to fit new oil pump without removing the engine? Why didn't I fit one when I replaced the engine?????
 
Yes it's possible. A bit of a pain but easier than taking the engine out but messy, you can even check the mains and big ends if you need to.
 
Back
Top