Hi there,
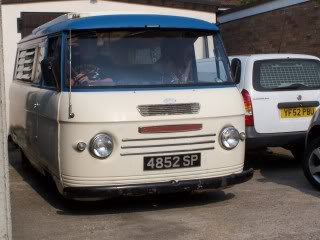
I thought I would start a thread in here seeing as there is going to be just a little bit of work carried out and a couple of hours spent on my 1969 Autosleeper.
I bought it back in November 2010 but had to store it in a friends barn until Feb when it then was moved over to another friends place for work to begin. My friends place in in Essex and I live in Bristol, so it's not like I can pop over do do an hours work whenever I feel like it!
The Commer is 200 miles from my house (4hrs average time to get there!) so updates will be sporadic depending on how much time I can free up to head over there whenever possible. I'd like to think I can make it once a month, but that won't always be the case.
When it arrived in Feb, my mate was busy with another project so it had to be kept outside until last week. This meant over 4 months sat outside which I don't think helped the condition of the vehicle, although to be fair I think the majority of the rust and damage had been done in the previous 40 odd years.
Here are some shots from the day I bought it....a cold and damp day in November:


The flutes along the sides are obviously missing and the previous owner had started work on the drivers side to make everything smoother and neater.
On the passenger side, a MASSIVE slab of filler had been put in and left really rough. I new the van was going to need some work, so just accepted this as part of what I would need to do.

I knew I would be replacing most of the lower panels and door bottoms, but generally the rest seemed fairly solid. I expect there will be more rot or damage discovered once work starts properly, but I was quite happy with the van overall


Nearly all the exterior had been hand painted, so there will be plenty of DA action going on to try and smooth things down a bit before I even think about spraying it. It won't be staying blue!
I will be booking a visit to Coventry Commer Panels to get a whole load of repair panels for it and I think my friend will be sorting the rest from scratch. He's pretty handy with a sheet of metal and a welder

I'm not 100% sure yet, but I might be selling on most of the front trim (bumper, grille, grille surround etc...) and the same with the rear bumper. Obviously if I decide to do this I will offer the bits to you guys on here.
Front seats look to be original but quite shabby. The foam has all collapsed and the rubber base mat that holds it in has disintegrated. The vinly has some long rips in a few places which is a shame because overall it's fairly nice otherwise. I will probably get them properly re-upholstered with new vinyl to make it really nice & neat.


I love the steering wheel and speedo pod.

The interior looks quite good in the pics but it's a bit tired, the wood is fairly de-laminated in a lot of places and the seat cushions will certainly be getting re-covered.


Original cooker and sink which is nice....although no fridge (something I hope to address at some point)

The biggest selling point to me was seeing my dog (Jed) jump straight in and make himself at home. As soon as I saw him asleep on the seat I knew that he liked it a lot which meant I was going to have it!

There will be a hell of a lot of work ahead but hopefully this will be nice useable camper when I've finsihed with it?
It'll be getting very stripped and lots of work done on it to freshen it up. I've worked on lots of cars over the years, built some cool ones but I've never owned a camper van before and it's a whole different territory for me, so I'll be bugging you guys with lots of questions about this & that!
Thanks for looking. More updates to come as things happen....
I thought I would start a thread in here seeing as there is going to be just a little bit of work carried out and a couple of hours spent on my 1969 Autosleeper.
I bought it back in November 2010 but had to store it in a friends barn until Feb when it then was moved over to another friends place for work to begin. My friends place in in Essex and I live in Bristol, so it's not like I can pop over do do an hours work whenever I feel like it!
The Commer is 200 miles from my house (4hrs average time to get there!) so updates will be sporadic depending on how much time I can free up to head over there whenever possible. I'd like to think I can make it once a month, but that won't always be the case.
When it arrived in Feb, my mate was busy with another project so it had to be kept outside until last week. This meant over 4 months sat outside which I don't think helped the condition of the vehicle, although to be fair I think the majority of the rust and damage had been done in the previous 40 odd years.
Here are some shots from the day I bought it....a cold and damp day in November:
The flutes along the sides are obviously missing and the previous owner had started work on the drivers side to make everything smoother and neater.
On the passenger side, a MASSIVE slab of filler had been put in and left really rough. I new the van was going to need some work, so just accepted this as part of what I would need to do.
I knew I would be replacing most of the lower panels and door bottoms, but generally the rest seemed fairly solid. I expect there will be more rot or damage discovered once work starts properly, but I was quite happy with the van overall
Nearly all the exterior had been hand painted, so there will be plenty of DA action going on to try and smooth things down a bit before I even think about spraying it. It won't be staying blue!
I will be booking a visit to Coventry Commer Panels to get a whole load of repair panels for it and I think my friend will be sorting the rest from scratch. He's pretty handy with a sheet of metal and a welder
I'm not 100% sure yet, but I might be selling on most of the front trim (bumper, grille, grille surround etc...) and the same with the rear bumper. Obviously if I decide to do this I will offer the bits to you guys on here.
Front seats look to be original but quite shabby. The foam has all collapsed and the rubber base mat that holds it in has disintegrated. The vinly has some long rips in a few places which is a shame because overall it's fairly nice otherwise. I will probably get them properly re-upholstered with new vinyl to make it really nice & neat.
I love the steering wheel and speedo pod.
The interior looks quite good in the pics but it's a bit tired, the wood is fairly de-laminated in a lot of places and the seat cushions will certainly be getting re-covered.
Original cooker and sink which is nice....although no fridge (something I hope to address at some point)
The biggest selling point to me was seeing my dog (Jed) jump straight in and make himself at home. As soon as I saw him asleep on the seat I knew that he liked it a lot which meant I was going to have it!
There will be a hell of a lot of work ahead but hopefully this will be nice useable camper when I've finsihed with it?
It'll be getting very stripped and lots of work done on it to freshen it up. I've worked on lots of cars over the years, built some cool ones but I've never owned a camper van before and it's a whole different territory for me, so I'll be bugging you guys with lots of questions about this & that!
Thanks for looking. More updates to come as things happen....