
You are using an out of date browser. It may not display this or other websites correctly.
You should upgrade or use an alternative browser.
You should upgrade or use an alternative browser.
HFB 287G Lulu and her history
- Thread starter Lulu
- Start date
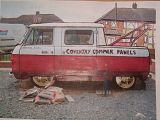
yes like colin and les have mentioned earlier, the van is well and truly underway now, and there is no stopping now. having been laid up for some time, poor les was getting a little frustrated and thought he might like to use the van next year, and so he decided to try and get it back on a fast track to get it finished in time to get some summer sun!, (that's if we ever get any les). anyway once the van first arrived at our unit, we had to unload all of the contents,from out of the back of it, in order to see exactly where the vans restoration was actually up too at this stage. the van had obviously been worked on and a number of repairs had been done, but due to it standing around for a little while ,a layer of fine surface rust had reared its head on the un protected areas of bare metal, so this was going to be the frst task in hand, so we set about the van by removing all of this fine rust, and gave the van a good dowsing of rust treater in order make sure it was dead. after looking around the van it was obvious that most of its previous repairs had been undertaken around the lower half or mid rift of the van, but there was still quite a lot to do. I decided to start at the top of the van first, where it looked as though hardly any repairs had been started yet, other that some around by the front peak, there was lots of areas of the roof guttering along the sides of the van which were peppered with rust holes, and in some places we had to remove whole sections and weld in new metal in orde to get it back to how it should be. at the back of the van the rear curved part of the roof was very poor , and we had to cut out a two inch strip across the whole width of the vans roof in order to weld in new repair sections, im sure you can see that in the pictures les had put up. once done we cleaned the area up and filled the repair, once sanded back we then primer coated this section of roof, in order to not have a repeat of the rust situation like what happened before. after we had completed any repairs on the roof we then set about doing the same procedure on the front and rear doors, and getting these into primer as quickly as possible. lately we have been working on the engine and getting it un seized, as when it arrived we just could not turn the engine over by hand, even when using a starting handle, not sure why it was like this! but boy was it locked solid, a bit of lube down the spark plug holes over a few days though soon sorted this little hick up out, and she is as free as a bird now les. we have also started putting all the new bells and whistle back onto the vans engine, new radiator, as the original was missing, new hoses, new carb etc etc, and its really starting to take shape under there now, all shiney and new looking!. whilst working on the engine bay, we carried on regardless on the outside of the van, and managed to weld on, the two new lower side panels, supplied by our good selves at Coventry comer panels! and we finished off any bad areas of bodywork that needed doing and any repairs which were not finished by others around the mid section of the van, now the outside is really starting to look as though its taking shape, just how the van should be looking. I think we have about another week or two of finishing off on the bodywork , and then I think we will be ready or in a position for shooting some paint. I think ive covered all the angles and questions that les wanted answering, so keep watching this space, and follow the progress of leslies van, and see how its transformed from one of the ugly sisters into the Cinderella that les always wanted.")
Big Bad Woolf
Big Bad Woolf
Enigma
0
quote:
Originally posted by Lulu
I still don't know how to put smileys on my messages
quote:
Originally posted by Enigma
 ''COMMER'EnSayThat''
Member of The 6-Speed Club
When you reply, to the left of where you type your message are 20 different smileys you can use, just click on the one you want to use[)][8D][|)][?][V][^][:0]
''COMMER'EnSayThat''
Member of The 6-Speed Club
Originally posted by Lulu
I still don't know how to put smileys on my messages
quote:
Originally posted by Enigma
Member of The 6-Speed Club
When you reply, to the left of where you type your message are 20 different smileys you can use, just click on the one you want to use
[)][8D][|)][?][V][^][:0]
Member of The 6-Speed Club
Make sure you hit 'reply to a topic' at the top of the page and don't use the quick reply box at the bottom. The quick reply box has no smileys
'I intend to live forever - so far, so good'
'I intend to live forever - so far, so good'
Enigma
0
What with your new found education on 'Smileys' wand the new photo's ......I find myself 'lost' and crossed between thinking........A) will the van make it to the next meet! ....or B) Will Les make it to the next meet? ...........either way, I hope ya keep ya clothes on!
''COMMER'EnSayThat''
Member of The 6-Speed Club
Member of The 6-Speed Club