
You are using an out of date browser. It may not display this or other websites correctly.
You should upgrade or use an alternative browser.
You should upgrade or use an alternative browser.
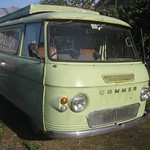
Dolly The Autosleeper
- Thread starter paulcloke
- Start date
just a couple of extra pics i didnt add yesterday ")
made this section up roughly, im not sure if i will use it yet as from what i have seen it should have a slight curve where it meets the floor and mine dont lol

This is a small plate i have made for the cab floor. pic is a bit dark but hopefully you can see it ok. all i gotta do is remove the surface rust and weld it in it joins to the first pic

Dolly Commer Is Here http://66.129.69.181/forum/topic.asp?TOPIC_ID=6833
made this section up roughly, im not sure if i will use it yet as from what i have seen it should have a slight curve where it meets the floor and mine dont lol
This is a small plate i have made for the cab floor. pic is a bit dark but hopefully you can see it ok. all i gotta do is remove the surface rust and weld it in
it joins to the first pic
Dolly Commer Is Here http://66.129.69.181/forum/topic.asp?TOPIC_ID=6833
I took some pics of the inner step but they're crap[8)] See if these help, taken of Bonnie when I was doing that job.
Outer step removed

New inner

Tacked in place

Outer step fits neatly over

It extends all the way upto the front outrigger under the cab floor

And back beyond the jacking point(mines been chopped out) where it joins the rest of the inner sill

I'm just about to do an update on BOTG that carries on from this bit
How refreshing
Outer step removed
New inner
Tacked in place
Outer step fits neatly over
It extends all the way upto the front outrigger under the cab floor
And back beyond the jacking point(mines been chopped out) where it joins the rest of the inner sill
I'm just about to do an update on BOTG that carries on from this bit
How refreshing
Finally a day of REAL progress. weather was cold and wet But i was determined [^] Spent an hour sweeping and removing things like the filler pipe and neck and just looking to work out how to do it. Then i gritted my teeth and started cutting off the outer sill and rear corner

as you can see the rear corner is pretty poop so im gonna have to try to repair that for now til i can replace it i decided to cut the rear corner and side sill off in 1 piece

[B)] oh no, remember that inner sill i thought i had[?]

Had a ten min brake to let my grinder cool off and then attacked my floor 1 small piece at a time [}] these should show you what i mean about my outrigger john [B)]


Another ten mins and this is what was left of my outrigger and spring hanger gotta save the tube though. does anyone know how to remove the rubber without harming it?

OUCH, sliced my hand on the damn thing. 5 mins and a pwaster later and

pulled out the wheel arch and now dolly is ready for a quick clean up and major repair

OOPS. didnt think my rear jacking point was this bad. will have to try to replace the rotten half i think [^]

So a pretty productive day all in all. after doing all that i evan found the time to cut 4x 1.5 foot strips of steal ready to make the inner sills i evan have a cunning idea. if it will work, will draw it up and show you soon. im hoping to avoid the problem of bending the inner sill out by the rear wheel by keeping it straight but stepping it up to allow room to get the wheel in and out
Dolly Commer Is Here http://66.129.69.181/forum/topic.asp?TOPIC_ID=6833
But i was determined [^] Spent an hour sweeping and removing things like the filler pipe and neck and just looking to work out how to do it. Then i gritted my teeth and started cutting off the outer sill and rear corner
as you can see the rear corner is pretty poop so im gonna have to try to repair that for now til i can replace it
i decided to cut the rear corner and side sill off in 1 piece
[B)] oh no, remember that inner sill i thought i had[?]
Had a ten min brake to let my grinder cool off and then attacked my floor 1 small piece at a time [}
] these should show you what i mean about my outrigger john [B)]
Another ten mins and this is what was left of my outrigger and spring hanger
gotta save the tube though. does anyone know how to remove the rubber without harming it?
OUCH, sliced my hand on the damn thing. 5 mins and a pwaster later and
pulled out the wheel arch and now dolly is ready for a quick clean up and major repair
OOPS. didnt think my rear jacking point was this bad. will have to try to replace the rotten half i think [^]
So a pretty productive day all in all. after doing all that i evan found the time to cut 4x 1.5 foot strips of steal ready to make the inner sills
i evan have a cunning idea. if it will work, will draw it up and show you soon. im hoping to avoid the problem of bending the inner sill out by the rear wheel by keeping it straight but stepping it up to allow room to get the wheel in and out
Dolly Commer Is Here http://66.129.69.181/forum/topic.asp?TOPIC_ID=6833
Most of that will buff out
The rubbers need a bit of force/levering to get out
"You,re only supposed to blow the bloody SLIDING doors off"
The rubbers need a bit of force/levering to get out
"You,re only supposed to blow the bloody SLIDING doors off"
getting that rubber out will be fun but im well on my way now. if i get time tomorrow i will bend the inner cills up and offer them up. i have saved enough floor to use self tappers to hold it in place so hopefuully by the time my dad gets down i should have 1 whole side waiting
Dolly Commer Is Here http://66.129.69.181/forum/topic.asp?TOPIC_ID=6833
Dolly Commer Is Here http://66.129.69.181/forum/topic.asp?TOPIC_ID=6833
quote:
Panky Posted - 23 Oct 2012 : 19:30:42
--------------------------------------------------------------------------------
Blimey you're a demon once you get going and well done for finding some actual metal- please though do me one favour and get a pair of gloves
How refreshing
I trust you are also wearing safety goggles when grinding rusty metal. Fine shards of metal in the eye can be very unpleasant and lead to a loss of sight. [B)]
'I intend to live forever - so far, so good'
yh got goggles mate. did have gloves but couldnt find em lol i would still be out there but dinner was ready and by the time i ate it had started getting a bit cloudy ant windy so i thought best not to use power tools no rain yet though so was a bad call really haha
Dolly Commer Is Here http://66.129.69.181/forum/topic.asp?TOPIC_ID=6833
no rain yet though so was a bad call really haha
Dolly Commer Is Here http://66.129.69.181/forum/topic.asp?TOPIC_ID=6833
Squeezed in another couple of hours today cutting and bending new metal [8D]
Made these 5 sections of inner sill first just need to clean the metal and weld it in i made them in 1.5 foot sections just to make it easier to manage. once they are all screwed in position they will be seam welded together then spot welded in place. not done the arch section yet [B)]

then finished off these bits, 2 x outriggers (just need to bend the ends) and a half section which will become my jacking point i hope :I

and 2 new front spring hanger sections (just gotta ad tube) these ones are the correct width :I[)]

i decided not to bend the ends as the arse end of dolly is so rotted and bubbled that i could not tell how long the spring hangers should be lol. but i know have enough new metal to begin assembling it all (with self tappers) ready for welding. the only other panels i need is the floor sections and the closing plates. so im hoping to get out to dolly in t5he next few days and start drilling the spot welds and getting the old inner sills off. then i can use the holes to give me a rough guideline of where the new one should be [8D]
Dolly Commer Is Here http://66.129.69.181/forum/topic.asp?TOPIC_ID=6833
Made these 5 sections of inner sill first
just need to clean the metal and weld it in i made them in 1.5 foot sections just to make it easier to manage. once they are all screwed in position they will be seam welded together then spot welded in place. not done the arch section yet [B)]
then finished off these bits, 2 x outriggers (just need to bend the ends) and a half section which will become my jacking point
i hope :I
and 2 new front spring hanger sections (just gotta ad tube)
these ones are the correct width :I[)]
i decided not to bend the ends as the arse end of dolly is so rotted and bubbled that i could not tell how long the spring hangers should be lol. but i know have enough new metal to begin assembling it all (with self tappers) ready for welding. the only other panels i need is the floor sections and the closing plates. so im hoping to get out to dolly in t5he next few days and start drilling the spot welds and getting the old inner sills off. then i can use the holes to give me a rough guideline of where the new one should be [8D]
Dolly Commer Is Here http://66.129.69.181/forum/topic.asp?TOPIC_ID=6833
lol, yh got most of the drivers side panels ready now[^] but after all that hammering and grinding my back is a little locked up haha im hoping i can make the panels up for the otherside before the start of welding week, if i can then we might get all but the cab area don in 1 hit [:0] then the rest is all just bodywork related bits its looking like i may get dolly roadworthy for the summer. but she will have no rear interior lol will have to go camping with a matress in the back haha
Dolly Commer Is Here http://66.129.69.181/forum/topic.asp?TOPIC_ID=6833
its looking like i may get dolly roadworthy for the summer. but she will have no rear interior lol will have to go camping with a matress in the back haha
Dolly Commer Is Here http://66.129.69.181/forum/topic.asp?TOPIC_ID=6833