Karrier Bantam Fun

The 'specialist' should have known better and should not have sent them out to you in the first place:mad:

I did supply the parts, so they might be justified in thinking I'd just bought rubbish parts and it was my problem. I agree they might have mentioned it though.

Anyway, I got on with the build today.................

First the timing housing went on, after fitting a new core plug behind.

2016_12034203build0001.JPG

It's a pleasure to be working with clean components, but................

2016_12034203build0003.JPG

I haven't washed the timing gears clean, as I opted to just put them in a poly bag, and leave the (black!) oil to protect them.
This photo isn't just for fun. I usually pick out the timing marks in Tippex, then put a spot on all the fixings as soon as they have been torqued up. Then I take a piccy, so I have a record of everything, including the fact that I have the timing marks all lined up. Saves me panicking that I might have forgotten something. You know, that horrible nagging doubt when it doesn't want to start.

Engine turned upside down and the new main bearing shells put in..............

2016_12034203build0002.JPG

Oooh! Shiny. Then lay in the crank (with assembly lube of course) and torque up the main bearings............

2016_12034203build0004.JPG

The crank is in lovely condition and turns without any hint of tightness (or slackness for that matter)

Timing cover back on.................

2016_12034203build0005.JPG

..............with a new crank seal, set further in to run on a fresh part of the pulley. This engine has a removable cover over the injection pump timing gear, so timing can be adjusted without taking the whole cover off. The gasket set is supposed to have gaskets for every application of this engine, so I used the wrong cover gasket......then had to take it off and do it all again!:confused:

Hopefully more tomorrow.
 
I meant the engine, thought you'd done it red Colin. Looking on a mobile phone it looks v smart :). Will look amazing if it's not even done.....
....told you ;)
 
Every scrap of orignal red paint has fallen off the aluminium parts, but the cast iron stuff has scrubbed up quite nicely. I'll degrease and paint it all (with etch primer on the ally) when it's assembled. In the factory, they just gave it a blow over everything with one coat of red when fully assembled.

I've just ordered core plugs and coolant hoses. Just like on the 4108 i did last year, there is one piece of cast aluminium tube in the coolant circuit, so it has acted a sacrifice while galvanic corrosion has nearly rotted it right through, and also nearly blocked it with a mass of white crystals. No chance of a new one, so I've had to re-engineer it using generic components. Also gives me a chance to make the whole thing more flexible against vibration.
 
Right................

Core plugs turned up today. Time to pull the old ones. They all looked great from the outside but

2016_12064203build0003.JPG

This one's pitted more than half way through and

2016_12064203build0004.JPG

this one crumbled into a hole as I pulled it out. Method of removal was a large self tapper and lever it out with a claw hammer, given a sharp smack with a rubber mallet. New ones are coated in silicone gasket and tapped gently in with the appropriate sized socket on a long extension, till they are just below the surface.

The message here is any time you can get access, change the core plugs! They are silently and slowly rotting away from the inside out.

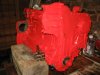
All replaced with shiny new ones.

2016_12064203build0005.JPG

Next to rebuild the head. First check that the valve springs are all the same length.

2016_12064203build0002.JPG

Which thankfully, they are, so the valves were given a quick reshape either side of the seat to remove the ridges, but being careful not to grind the seat itself.

2016_12064203build0001.JPG

The drill in the vice is rotating backwards, and the cordless is going forwards. It takes a couple of minutes to reshape the head. Then I gave the valves a quick lap-in to get rid of burn marks on the seats.

So the valves and cam followers were all put back in the head.

2016_12064203build0007.JPG

I like to superglue the rocker cover gasket on to the flange of the cover. That way, when I put the cover in place, even if I can't see the gasket, I know it's in the right place.

2016_12064203build0006.JPG

Other than that, today has been spent running a die over all the auxiliary fixing studs and bolts, and a tap through the nuts, finding matching washers and shakeproofs and generally tidying up all the bits and pieces ready to go back on.

I hope the replacement small ends turn up tomorrow, else I'll be at a standstill with the rebuild.
 
lovely job... Looks like mine, core plus we're just about through from the back too but the valve springs on mine looked like the john Cleese class sketch!
 
Painted all the bits today.

2016_12084203build0001.JPG

Had to paint in the conservatory, and hang the bits over the Aga to dry (I'm told at this point that I have to mention my lovely tolerant wife:rolleyes:) because the barn was a bit damp with the sudden warming of the weather. I've had electric heaters under the Commers to try to warm them up faster than the rising temperature. So far so good and no condensation!

The engine itself had to stay in the barn though, so I made sure it was good and warm before painting it.

2016_12084203build0003.JPG

This photo flatters my painting though. In reality it's difficult to get an even coat, especially the second one. And I don't like the (almost dayglo) pinky orange colour either (Halfrauds red engine paint). What the hell, it's only an engine.

At this point Jim, you are welcome to comment...........................
 

Attachments

  • 2016_12084203build0002.JPG
    2016_12084203build0002.JPG
    181.3 KB · Views: 1
That engine paint is absolutely the worst I have had the misfortune to use in a long time.

[rant]
It said "touch dry in 90mins. Fully cured after 16 hours".............. No........................... still tacky 24 hrs later.
It covers badly, hollows out at every edge, even after two coats.
If you warm it up to dry it out, it wrinkles.
I hate the colour. (Not their fault!)
That's HALFORDS RED HIGH TEMPERATURE ENGINE PAINT. Horrible.
By contrast, their standard black enamel in similar tins with similar claims, applied at the same time under the same conditions has been brilliant.
[/rant]
 
On the plus side, I got the small ends back properly fitted, so as soon as I can handle the other parts without getting covered in paint, I'll build the pistons and put them back.
 
Are the bits you painted in the conservatory still tacky too?

Yes. All tacky. Not sure if I can get the block in the Aga bottom oven though:rolleyes:

Seems that about 30C is an ideal temperature. Be nice if they said that on the instructions though. How many people might be able to have a workshop at a nice steady 30C.
 
I got some Halfords red and green (no not in the same tin Jim) the last time I did the Mini engine and it was great, proper red too. Bought some off eBay this time but I'm waiting until it's a little warmer (and drier) to use it. Might do a test piece to see what it's like.
 
Back
Top