Oh Bottoms!

Well we got to Kettering OK and engine running well. Good temperature and oil pressure with overdrive making motorways acceptable. Unfortunately we have an oil leak somewhere - possibly just rocker box. No oil at exhaust so will just keep topped up until we get home and hunt it down after an engine degrease..... Fingers crossed for return in a few days! 20220826_103252.jpg
 
So we went to a festival up in Kettering and got there an back (250 miles). New silicone sump gasket leaking badly but engine running well so fingers crossed.... looks like an oily weekend fixing the leak with old-school gaskets and cork strips!20220826_103252.jpg


Sent from my Galaxy
 
Well I was very carefull not to over-tighten and both end bits failed. Might be OK to fit on an engine being rebuilt on a stand but an effin £60 nightmare lying on a drive. Have ordered suitable cork and nitrile sheets to roll-my-own at the weekend -£35 and leaving loads of material for 'stock'.
 
Well I was very carefull not to over-tighten and both end bits failed. Might be OK to fit on an engine being rebuilt on a stand but an effin £60 nightmare lying on a drive. Have ordered suitable cork and nitrile sheets to roll-my-own at the weekend -£35 and leaving loads of material for 'stock'.
Next point is what temp do you chaps run engines at? Thermostat on my alpine engine seems to switch at about 92 and 98 degrees so nominal 95 degree thermostat I guess? Is this OK or too hot? I have an additional electric fan on a simple switch that can get temp down to about 80 which is perhaps a bit low..... Views?
 
I think the winter thermostat is set at 88deg C and the summer one 82. My Rapier engine is set up with an electric fan but no mechanical fan and runs below 90 - but I do have a bike rad in the heater return to help. The main fan only cut's in at 92 C after a long fast run, stuck in traffic or motorway climb. I also run a Davies Craig water pump.
 
OK so today mate Bob and I tackled the great sump leak. After jacking the front up and removing track rods from steering centre plate we jiggled off the sump. The new sump gasket set and misc gasket sheets hadn't arrived so we removed rocker box and rockers to re-torque the head. Amazingly as we finished this task the postie arrived with the gasket bits so no excuses to stop...... Loads of very carefull Wellseal applications and lots of tea and everything re- assembled. All looked good with adjusted tappets, new oil, new 82 degree thermostat etc etc. I even sorted the idle screws on the twin Strombergs (shocking metric 4mm screws I fear). Engine started perfectly and runs well so needs a few miles to see where the next 'opportunity' lies! :)
 
Commer sump gasket replacement Sat 3rd September 2022


As Helen returned with son Matthew from the Green-Gathering festival in Chepstor last month, Pootle blew a hole in Piston No1 on the M4 (over advanced timing causing Pinking I think)…

My mate Bob and I replaced the piston three weeks ago and fitted modern ‘fangled’ Silicone gaskets and seals on the sump and Helen and I drove up to the Greenbelt festival in Kettering the following week.

Unfortunately the silicone end seals over the main bearing caps failed big-time and we had massive oil leaks and used a can of oil to get home safely.

On the plus side the engine ran really well with good temperature and oil pressure.

On Sat 3rd we replaced the failed silicone parts with old-school paper gaskets and cork end strips as originally fitted;

Biggest problem is removal/refitting of the sump….

Jack front up high on axel stands.

Turn steering full lock one side and remove track-rod from centre plate.

Repeat above for other track rod.

Remove clutch slave cylinder and blanking plate from lower bell-housing.

Remove all sump bolts and wiggle off the sump – need to move steering plate to driver’s side, rotate engine (plugs out) to position to allow sump to have clearance on No1 conrod/web and remove sump from passenger side. This can be done but it is fiddley, claustrophobic and dirty!


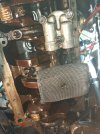
Once the sump was off, Bob cleaned off old seals and cleaned up the flange then used Wellseal to apply new side gaskets. I cleaned up the bottom of the engine with thinners and fitted the new cork strips to the bearing caps. The strips were correct length and pressed nicely into the milled grooves using suitable screwdriver to press them in cleanly. Lying on the drive doing this is very claustrophobic and my 18 years working on Tunnel Boring Machines helped here!

We then applied Wellseal to the bottom of the engine, fitted a couple of studs into two sump mounting holes for guiding the sump and fought for 15 mins to wiggle sump back on.

And, as John Haynes would say…. ‘Refitting is reversal of removal’….

Some pics of the task…20220903_113550.jpg20220903_113555.jpg20220903_114229.jpg20220903_114235.jpg20220903_114229.jpg

So with that done, here is the spare steering column ready for dismantling and adding a Prius electric steering system….. How hard can it be?

20220903_161343.jpg
 

Attachments

  • 20220903_114239.jpg
    20220903_114239.jpg
    1.7 MB · Views: 4
Good work - love to hear how the power steering goes. Never heard of using a Prius, usually a Corsa. Any advantages to a Prius one?
 
Not sure of pros and cons of Prius and Corsa power steering setups and both seem similar arrangements. I found a cheap Prius one a while ago but haven't tried testing it yet - finding spare steering column took a while. I think I went for the Prius one because it defaults to a certain rate of assist if it gets no CAN control signals wheras the Corsa does need some sort of dummy control-box adding to get it to work without a Corsa ECU setup. To be honest 'Management' has driven Pootle quite a bit now so is a little less concerned about the heavy steering so the project is a little less urgent and I'll experiment with it over the winter.
 
Ah, interesting about not needing the control unit. Something on my list do so when not so busy with the other 100 things I want to do :)
 
Back
Top